https://leanpub.com/balancebasics/read#leanpub-auto-making-balance-easier
A Note from the Author
I’ve been teaching balance (and learning how to) on and off for the last 7 years. But even before that I had a vague understanding of balance.
While I was in the army I was posted to Bavaria, to a ski Chalet would you believe, where I had the chance to do some cross country skiing and on occasion teach it.
Learning to get up hills, I figured out that I’d get the best grip by centering my weight over the pocket that contained the wax. This was in part garnered from my study of dynamics, which I was doing in my spare time since I’d quit school before graduating to join the army.
(The chief instructor, who hadn’t studied Dynamics, at least as far as I am aware, told me to learn forward for better grip. This in fact shifted my center of gravity ahead of the wax pocket and reduced the grip.)
Despite that insight into balance my understanding was limited in other situations such as cornering while riding a bicycle or motorbike (or even cornering while speedskating.)
It took me a long time to learn how to align my bikes center, my own center and the bike’s point of contact with the earth (call it the foundation) with the forces that were acting on us.
As an example, going down a hill that a friend and I used to ride regularly, I could never get used to the idea of leaning into the turn. The fear of falling out of the turn (or into it) I carried into speed skating. Once I got past a certain speed I would get scared and it was only learning how to feel balance and understand it, and learning how to practice, that has enabled me to gradually get better at cornering.
I believe that one of the reasons that I enjoy teaching balance is that it offers a window into learning to better feel the body and control it. It is a gateway into improving proprioception, kinaesthetic awareness or simply “feeling the body.”
Plus, very few people seem to understand it very well, or they understand how to balance but not how to teach it.
(As a case in point, many of the comments I get for a youtube video include thank you’s because no one else explains it as well as I do (at least not on youtube!))
The nice thing is, that with an understanding of balance, it becomes easier to teach it and learn it. It’s not actually that difficult to learn.
And the beauty of it is that the same principles of balance can be applied whether balancing on the hands or the feet or the top of the head.
Introduction
In some ways learning to balance is as simple as learning to drive a car. You just need to learn where to direct your awareness so that you can feel the parts of your body and operate them.
This book includes simple exercises designed to help you learn to feel your body and control it. With the ability to feel your body and the understanding of how to move it, you can apply the basics of balance to any posture, even the ones not included in this book.
Balance Basics
The goal in balance is to keep your center over your foundation. To that end it helps if you can feel how your center and foundation relate. When you feel this relationship moving out of balance the goal is to act in such a way that you put it back in balance.
And so to make it easier to stay balanced it helps if you learn how to feel your body and control it. The two things that you can focus on learning to feel and control are your center of gravity and your foundation.
If you can feel and control the way these two things relate you can stay balanced.
So to start of with, lets look at the foundation of a balancing yoga pose.
Three Uses for Foundation
In terms of balance, the foundation has three purposes.
Ground Contact Area
The foundation is the area over which you keep your center in order to stay balanced.
The part of your body that touches the floor creates a shape, an area over which you keep your center of gravity in order to stay balanced.
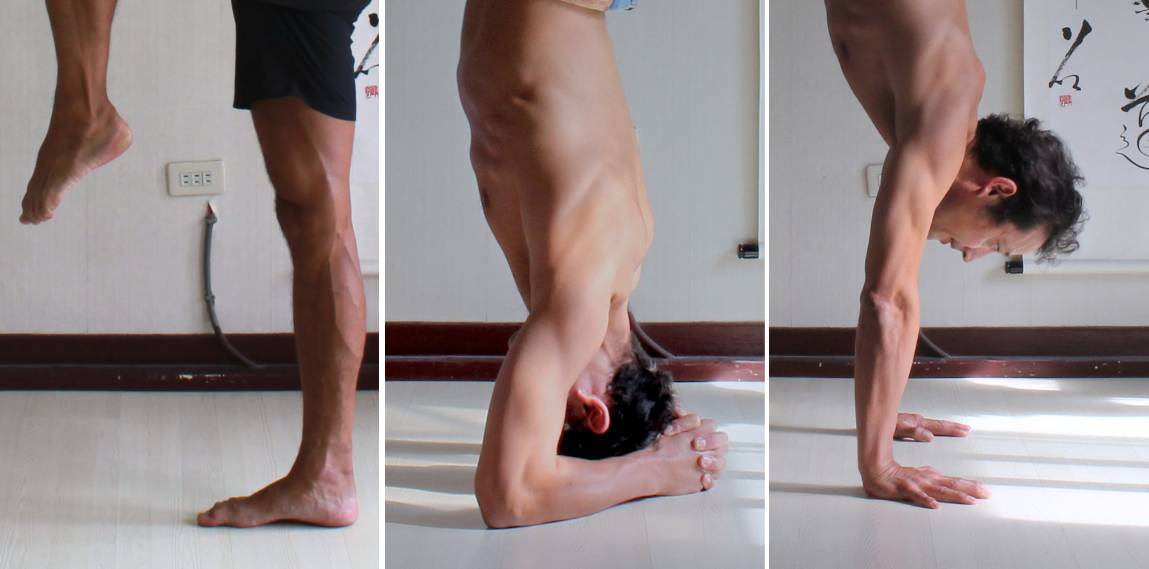
Foundations formed by standing on one foot, bound headstand, and handstand
In each of the three pictures above, the “Ground Contact Area” of the foundation is different.
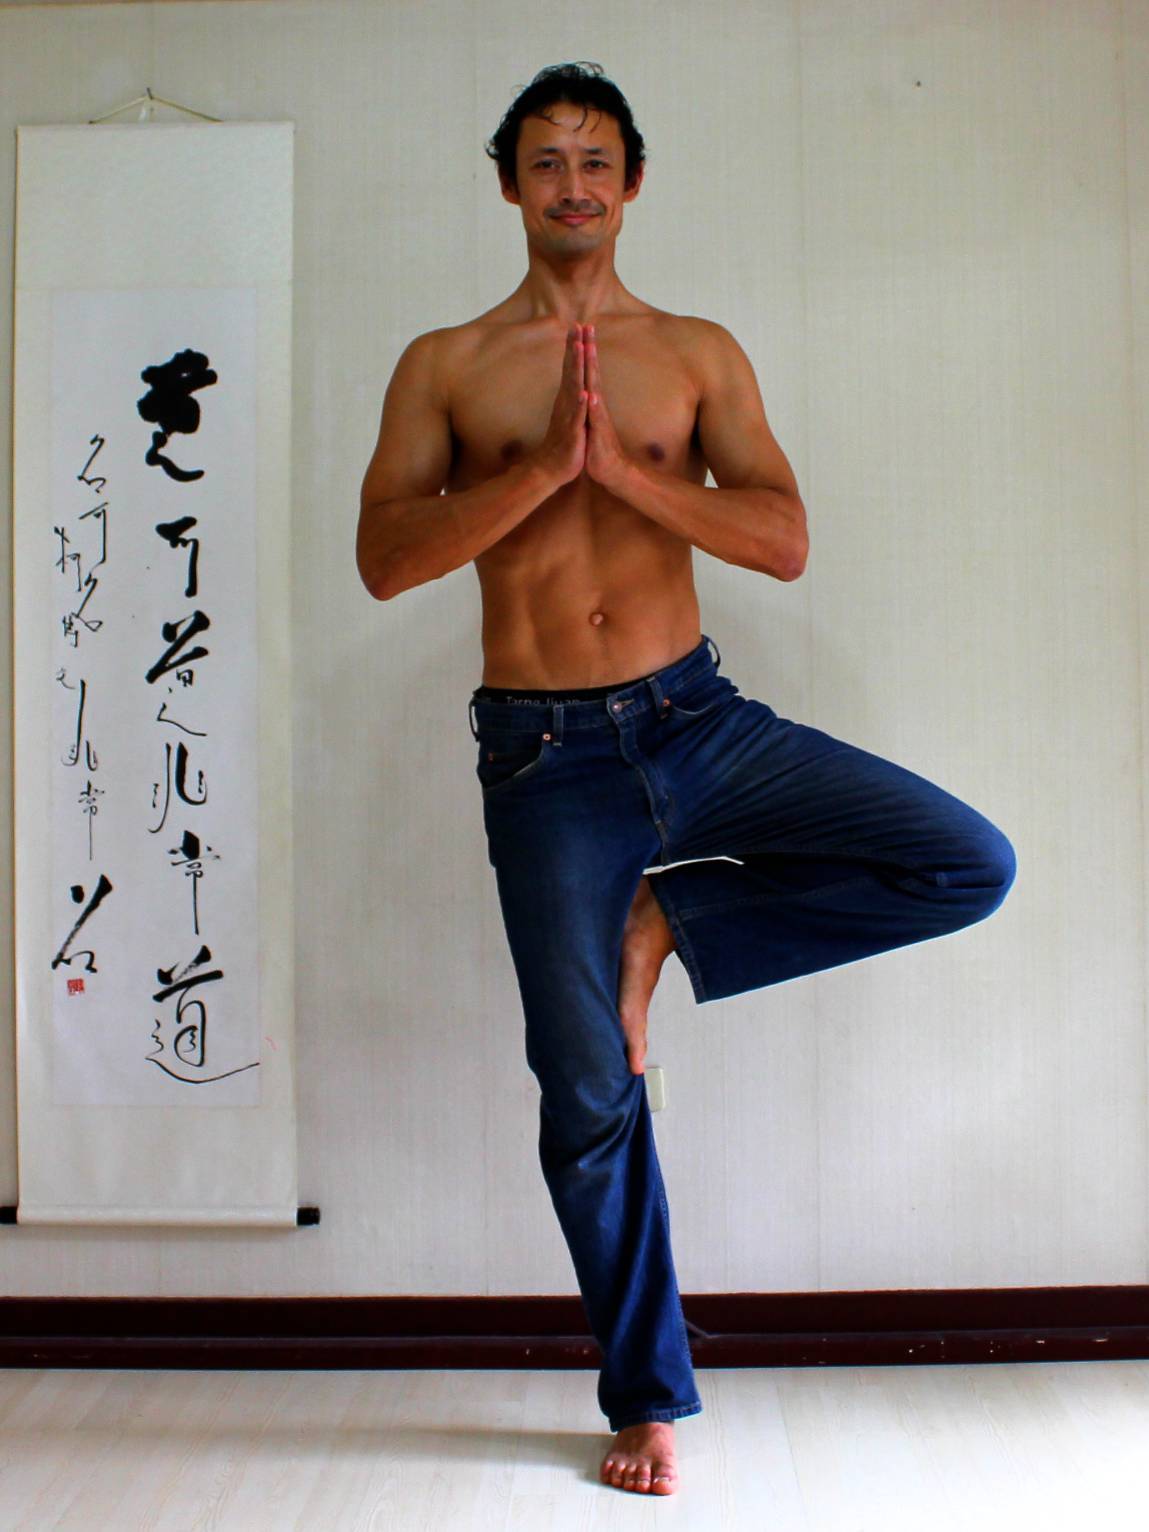
- In the first picture the foundation is the foot. You have to keep your center of gravity within the border of the standing foot in order to stay balanced.
- In the second picture the foundation is formed by the forearms and head. You have to keep your center within the triangle formed by the forearms to stay balanced.
- In the third picture the foundation is formed by the hands. You have to keep your center over the area framed by the hands. That means it can be over one hand, or the other hand or somewhere over the area between the two hands to stay balanced.
The Ground Contact Area of Your foundation marks the boundaries within which you are trying to keep your center.
Stability
The second purpose of a foundation is to keep your body stable.
For a building, stability is created by digging foundations deep within the earth. The higher the building the deeper (and/or wider) the foundation has to be.
We don’t have that luxury.
Instead we can stabilize the lowest part of our body, the part closest to the ground, to stay balanced.
Using the same three examples:
- Standing on one leg we can stabilize the standing foot, ankle and leg all the way to the hip joint and pelvis.
- Balancing on head and forearms we can stabilize shoulders and arms, head and neck and perhaps even the ribcage and pelvis (using the abs.)
- Balancing on the hands, we can stabilize hands, wrists, elbows, shoulders, neck, ribcage and pelvis.
With a stable foundation it is easier to keep our center of gravity over our Ground Contact Area. But even if our center starts to move towards the edges of our foundation, then with a stable and strong foundation, we can use our foundation to help bring our center back within bounds.
Sensitivity
The third use of a foundation when balancing is as a sensing or measuring device. We can use it to feel where our center is in relation to our foundation.
By learning to use our foundation to feel where our center is we can notice both when we are moving out of balance and when we are in balance. It’s like using a speedometer to check our speed. If we are driving at the speed we desire we do nothing. But if we aren’t then we use the brakes or accelerator as required.
Center of Gravity
The Center of Gravity is the part of our body that we have to keep over our foundation in order to balance. It’s position changes depending on how the arms, legs, head and torso all relate. This is because each of these parts has their own individual center of gravity.
By changing the shape of our body we can shift our center of gravity relative to ourselves.
Here’s some examples.
Using the Arms to Shift Our Center
To experience how our center of gravity can be affected by moving our limbs (“shape shifting” or “shape changing”) you can stand on tip toes with your torso horizontal. (More on how to balance on the fronts of your feet later.)
Start with your arms back and then reach them forwards while staying balanced. Then move them back again.
Reaching your arms will cause your body to move back so that you stay balanced over the fronts of your feet. Moving your arms back will cause your body to move forwards.
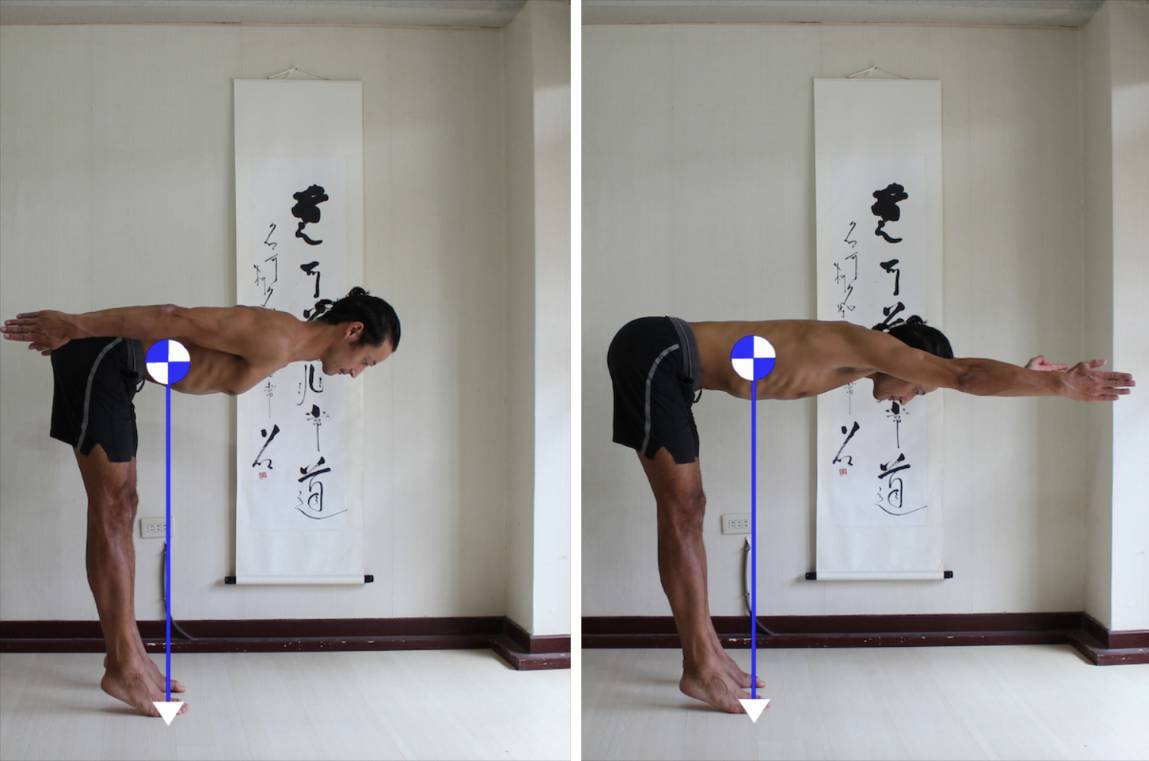
1. In the first picture my legs are more vertical. My center is further away from my head 2. In the second picture, with my arms reaching forwards, my legs are angle to the left. My center has moved closer to my head
The arms have weight. Because of this we can move them and cause our center of gravity to shift relative to our body.
Moving our arms forwards shifts our center forwards while moving them back causes it to move back. Our body then has to shift if we want to keep our center over our foundation.
Positioning Our Center Outside of Our Body
Another way to experience “shifting” your center is to stand on one leg and do a side bend to the opposite side.
Standing on your left leg, you could try pushing your hips to the left and reach your torso and arms to the right. Or just look at the pictures below.
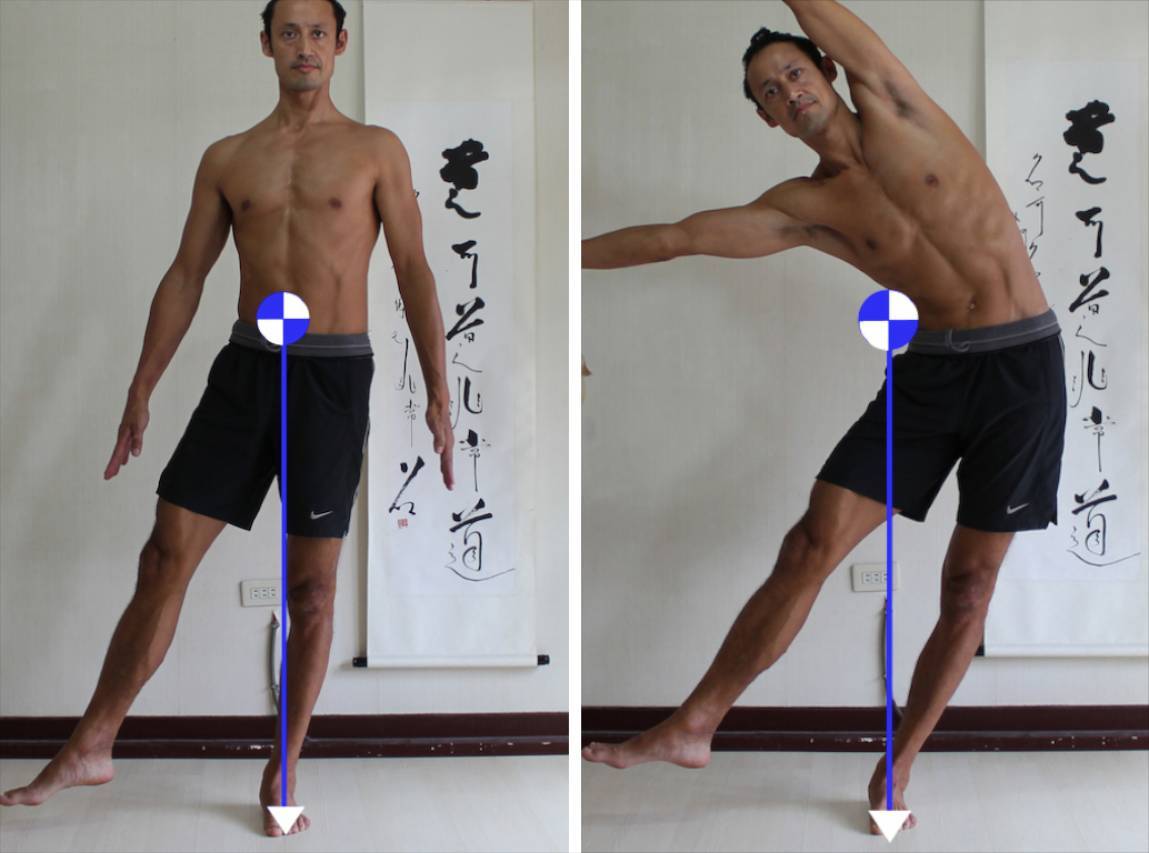
1. Standing upright while balancing on one leg. My center is near my belly button. 2. Pushing hips towards the left while reaching arms and ribcage to the right. My center has moved to the side of my waist.
In both pictures I am balanced on my left foot.
In the first picture, with my torso reasonably upright, my pelvis is over my foot and my center of gravity (represented by the circle) is near my belly button.
In the second picture, bending to the side, my center of gravity is to the outside of my waist. It is actually outside of my body! While my center has shifted relative to my body, my body has also shifted with the net result that I’ve kept my center over my foundation.
I’m still balanced.
The point here is that when we understand that “shape changing” can shift our center we can use that understanding to make staying balanced easier.
Knowing that a shape change could change the position of our center of gravity we can move in such a way that we keep our center over our foundation.
Shifting Center In Peacock Pose
In the pose below, called peacock pose the hands are the foundation. But the belly rests on the elbow in what could be thought of as a “secondary” foundation.
One way to shape change in this pose is to bend the knees… and then straighten them again.
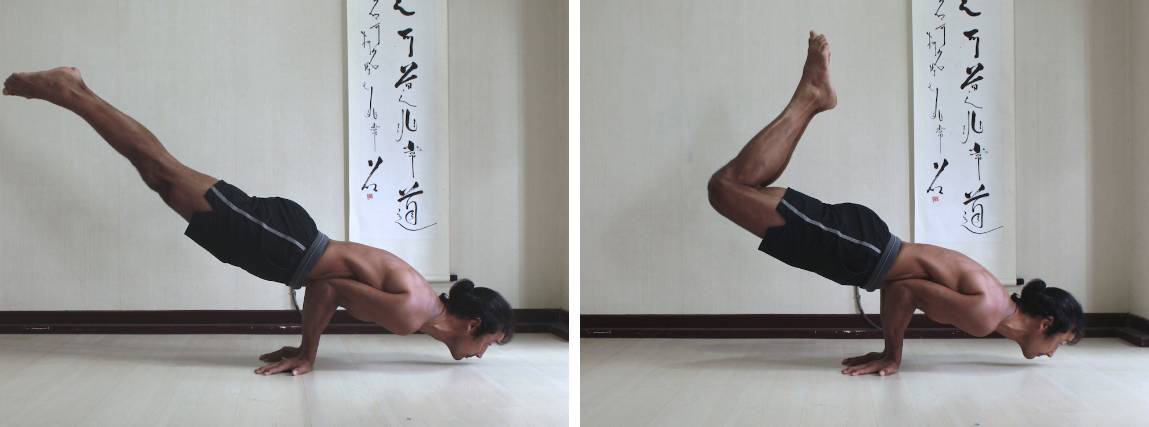
1. Peacock pose (mayurasana) with knees straight. 2. With knees bent.
Bending the knees shifts the bodies center of gravity and moves it closer to the head.
With the knees straight the center of gravity is further away from the head.

1. Peacock pose with knees bent, note how center is closer to the top of my shorts. 2. With knees straight my center moves towards the bottom of my shorts.
If you look at the two pictures above you can see that with my knees bent, my forearms are more vertical. With knees straight my forearms angle forwards.
With knees straight I have to shift my body forwards in order to position my center of gravity over my hands. With knees bend I have to move my body back.
Shifting Center in Headstand with Legs Straight
The pictures below show two variations of headstand, one with legs horizontal, the other with legs vertical.
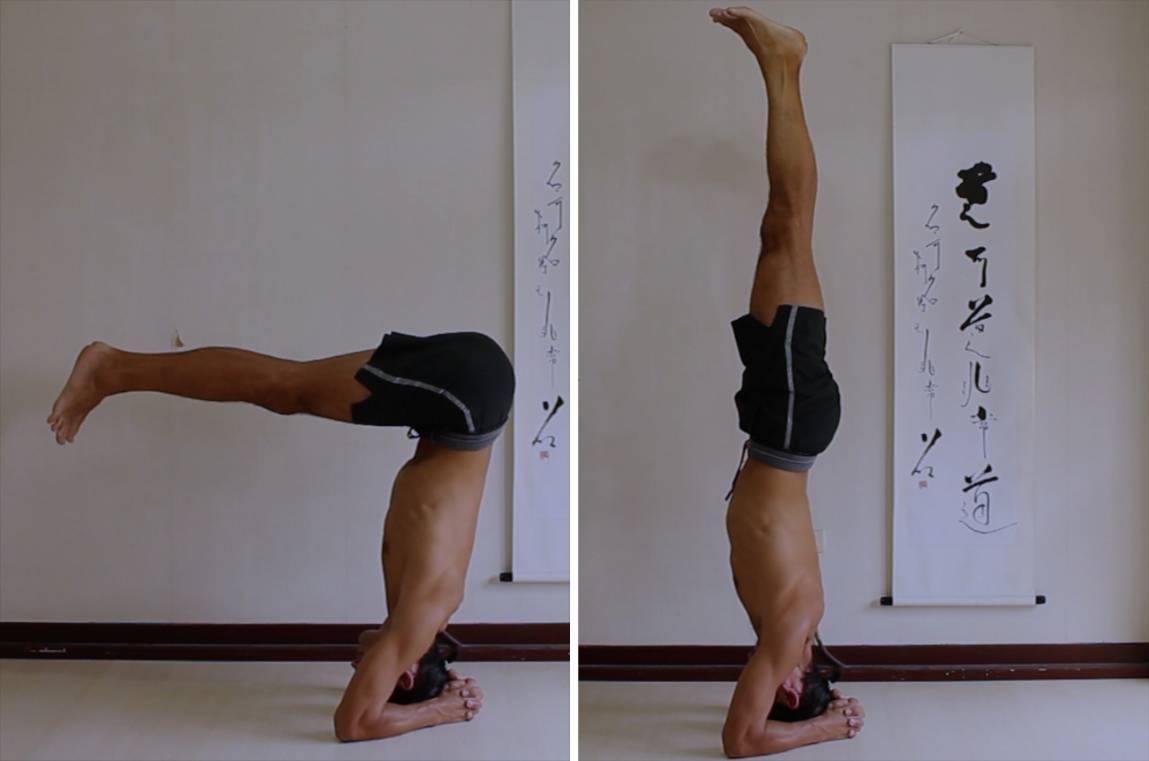
1. Legs horizontal. Notice how close my pelvis is to the edge of the scroll behind me. Also my back is straight (but not vertical.) 2. Legs vertical. Notice now how my pelvis has moved further away from the edge of the scroll. Legs and spine are in one straight line.
Legs are heavy. And lifting them horizontally in headstand shifts our center relative to our whole body.
With legs horizontal, I need to do something to balance the weight of my legs. So my pelvis moves back. I then stay balanced.
Lifting my legs to vertical, I no longer have to counterbalance the weight of my legs so I can move my pelvis back over my foundation to stay balanced.
In the two pictures above, notice the difference in inclination of my upper body. You can use the edge of the scroll as a reference. In the first picture with legs horizontal my hips lean towards the scroll. In the second picture my torso is more vertical.
Control Your Center
While changing the shape of our body can shift the location of our center of gravity, our center does tend to stay within the region of our pelvis. And so one of the key areas we can learn to feel and control in order to make balancing easier is the pelvis.
The ideal is to be able to feel and control the whole body, but if that isn’t yet possible (or we are feeling lazy) then controlling the pelvis is a pretty good substitute.
If you are using your foundation to feel your center and you feel your center of gravity moving to the left then focus on moving your pelvis to the right until your center is where you want it to be.
If you feel your center shifting forwards then move your pelvis back.
I should say here that while the center of our body is pretty close to our pelvis, our pelvis isn’t our center. The position of our center of gravity relative to the pelvis is affected by the position of all of the parts of our body (each with their own center.)
So if you feel your center moving forwards it may be because your head is moving forwards, or your arms or perhaps a leg. And so you can counter the movement of your head by moving your pelvis in the opposite direction just the right amount.
How do you know what is the right amount?
One way is to use your foundation to feel the position of your center.
What if you are doing a pose or in a position where you can’t move your pelvis in order to shift your center?
Then you’ll have to move something else.
But more on that later.
Making Balance Easier
If we are aware of how to balance, we can change what we are doing to make balance easier or harder. We can vary postures to eliminate the balance component so that we can focus on some other element of body awareness. Or we can add balance in so that balance is the focus.
Removing the Balance Component (And Adding It Back In)
In yoga poses where you are using both feet, the wider your base the easier it is to balance. If you want to focus on something other than balance then it may help to make your foundation wider. As an example, in Warrior 1, you can make your foundation wider from side to side so that you can focus on, for example, reaching your ribs and arms upwards away from your pelvis.
But then if you want to work on balance in this pose, then make your foundation narrower from side to side.
Note that even with your feet on the same line, your foundation is still wide enough to give you some control over your body. You have some leverage with which you can help stay balanced. However, it isn’t a lot.
Warrior 1:
1. Legs wider from side to side.
2. With narrow stance.
1. Legs wider from side to side.
2. With narrow stance.
With a narrow foundation you’ll have to stay focused to stay upright. (And it helps if you stabilize your feet and ankles.)
Lowering Your Center 1
Standing on one leg you don’t have the option of making your base wider or narrower. But you can bring your center of gravity closer to the earth by bending your standing leg knee.

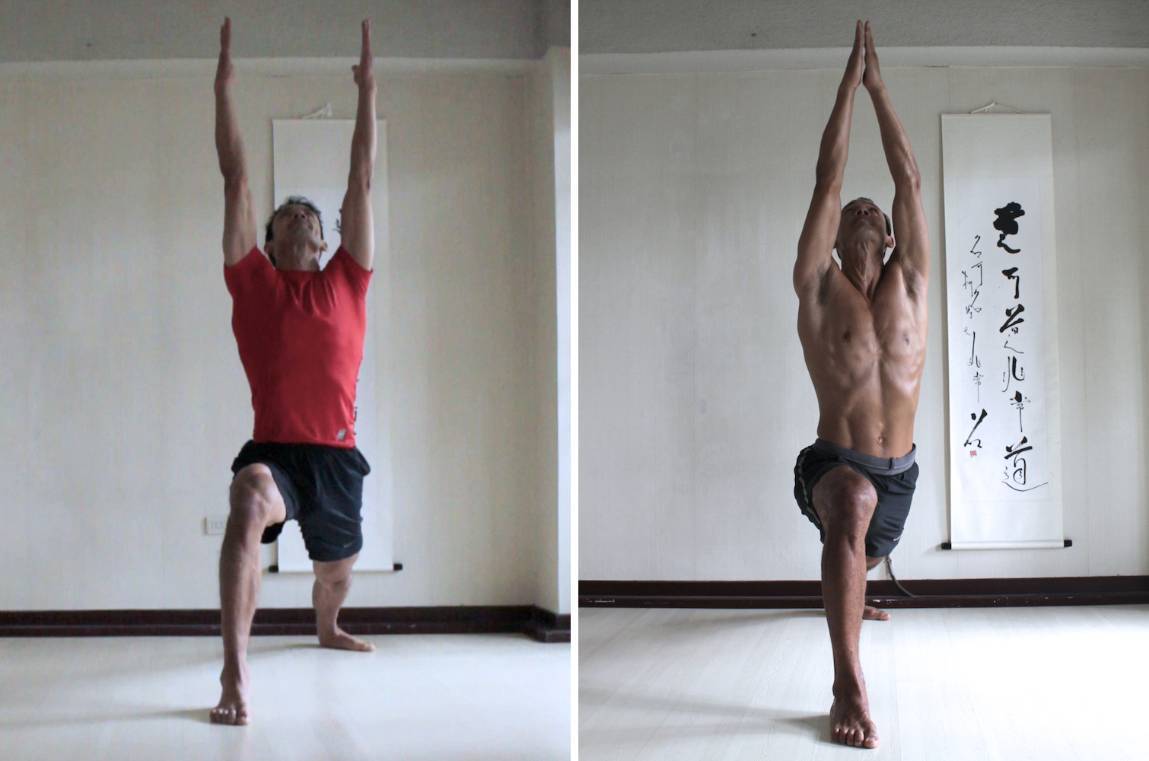
Warrior 3 with Standing Knee Bent:
1. Arms back.
2. Arms reaching forwards.
1. Arms back.
2. Arms reaching forwards.
In warrior 3, bending the standing knee lowers your center of gravity, making it easier to balance. It also gives you the chance to focus on something else such as making your body feel long.
To work towards a straight standing leg, first practice straightening your standing leg while inhaling and bending it while exhaling. Do this slowly. Then work at holding the pose with your standing knee straight.
Lowering Your Center 2
Inverted poses, like Headstand and Handstand, can also be made easier by bringing your center of gravity closer to the earth.
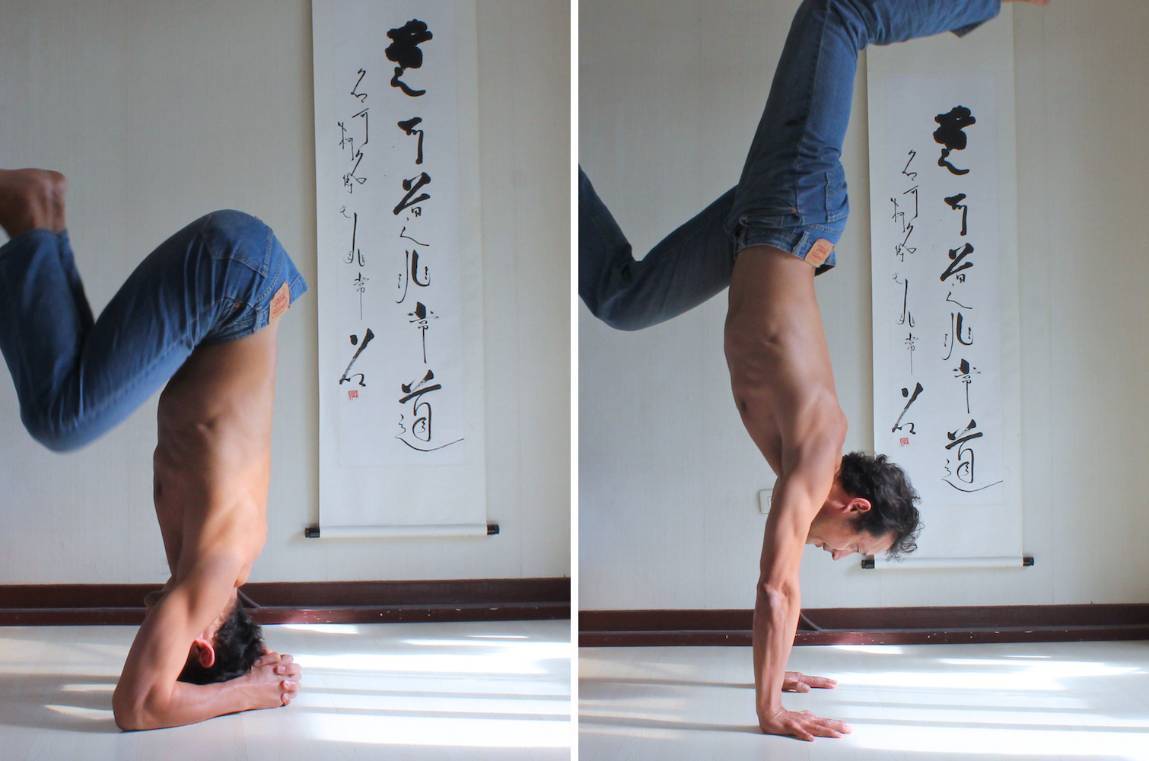
Headstand and Handstand:
1. Headstand with knees bent.
2. Handstand with legs reaching front and back.
1. Headstand with knees bent.
2. Handstand with legs reaching front and back.
In headstand you can do that by bending your knees and bringing them to your chest. You can also do the same in handstand though it might require you to angle your arms so that your shoulders are ahead of your finger tips.
Another option in handstand (and headstand) is to reach one leg forwards and the other leg back.
For headstand, once you are used to balancing with a lower center of gravity, work at gradually straightening your legs and reaching them upwards while staying balanced. For handstand, work at bringing the legs together, perhaps with knees bent first, and then reach the legs up while staying balanced.
Peacock Made Easier
If you are having trouble in peacock pose, such as not being able to lift your feet while your knees are straight, then bend your knees. You then don’t have to move your body so far forwards in order to get your knees off of the floor.
Once you’ve gotten used to balancing with your knees bent, you can work at slowly straightening your knees while working at staying balanced.
As you straighten your knees reach your body further ahead of your hands to stay balanced.
In this case we use shape shifting to move our center relative to our body to make balance easier.


