https://yogainternational.com/article/view/how-to-stretch-and-strengthen-the-psoas
Want to find a new sense of balance and freedom in your practice? Learn how to skillfully stretch and strengthen the mysterious psoas muscle.
ON June 7, 2013
 Most yoga students are aware that the psoas is a central player in asana, even if the muscle’s deeper function and design seem a mystery. A primary connector between the torso and the leg, the psoas is also an important muscle off the mat: it affects posture, helps stabilize the spine, and, if it’s out of balance, can be a significant contributor to low back and pelvic pain. The way that we use the psoas in our yoga practice can either help keep it healthy, strong, and flexible, or, conversely, can perpetuate harmful imbalances.
The psoas is a deep-seated core muscle connecting the lumbar vertebrae to the femur.
The psoas major is the biggest and strongest player in a group of muscles called the hip flexors: together they contract to pull the thigh and the torso toward each other. The hip flexors can become short and tight if you spend most of your waking hours sitting, or if you repeatedly work them in activities like sit-ups, bicycling, and certain weight-training exercises.
A tight psoas can cause serious postural problems: when you stand up, it pulls the low back vertebrae forward and down toward the femur, often resulting in lordosis (overarching in the lumbar spine), which is a common cause of low back pain and stiffness; it can also contribute to arthritis in the lumbar facet joints. On the other hand, a weak and overstretched psoas can contribute to a common postural problem in which the pelvis is pushed forward of the chest and knees. This misalignment is characterized by tight hamstrings pulling down on the sitting bones, a vertical sacrum (instead of its usual gentle forward tilt), and a flattened lumbar spine. Without its normal curve, the low back is weakened and vulnerable to injury, especially at the intervertebral discs.
The way that we use the psoas in our yoga practice can either help keep it healthy, strong, and flexible, or, conversely, can perpetuate harmful imbalances.
To help you create balance in the psoas and keep your low back healthy, it is important to first understand the anatomy. Then you’ll see why the psoas is integral to asanas as diverse as navasana (boat pose) and setu bandha sarvangasana (bridge pose), and how to engage and stretch this massive muscle for optimal benefit.
ON June 7, 2013


Most yoga students are aware that the psoas is a central player in asana, even if the muscle’s deeper function and design seem a mystery. A primary connector between the torso and the leg, the psoas is also an important muscle off the mat: it affects posture, helps stabilize the spine, and, if it’s out of balance, can be a significant contributor to low back and pelvic pain. The way that we use the psoas in our yoga practice can either help keep it healthy, strong, and flexible, or, conversely, can perpetuate harmful imbalances.
The psoas is a deep-seated core muscle connecting the lumbar vertebrae to the femur.
The psoas major is the biggest and strongest player in a group of muscles called the hip flexors: together they contract to pull the thigh and the torso toward each other. The hip flexors can become short and tight if you spend most of your waking hours sitting, or if you repeatedly work them in activities like sit-ups, bicycling, and certain weight-training exercises.
A tight psoas can cause serious postural problems: when you stand up, it pulls the low back vertebrae forward and down toward the femur, often resulting in lordosis (overarching in the lumbar spine), which is a common cause of low back pain and stiffness; it can also contribute to arthritis in the lumbar facet joints. On the other hand, a weak and overstretched psoas can contribute to a common postural problem in which the pelvis is pushed forward of the chest and knees. This misalignment is characterized by tight hamstrings pulling down on the sitting bones, a vertical sacrum (instead of its usual gentle forward tilt), and a flattened lumbar spine. Without its normal curve, the low back is weakened and vulnerable to injury, especially at the intervertebral discs.
The way that we use the psoas in our yoga practice can either help keep it healthy, strong, and flexible, or, conversely, can perpetuate harmful imbalances.
To help you create balance in the psoas and keep your low back healthy, it is important to first understand the anatomy. Then you’ll see why the psoas is integral to asanas as diverse as navasana (boat pose) and setu bandha sarvangasana (bridge pose), and how to engage and stretch this massive muscle for optimal benefit.
How to Find the Psoas
Although the psoas is one of the most important muscles in yoga poses, it is also one of the most misunderstood. Many students and even teachers have only a vague idea of where it is located. The psoas originates from the lumbar vertebrae and forms a strip of muscle almost as big as a wrist along each side of the spine. Looking at the front of the body, you’d have to remove the intestines and other digestive organs, as well as the female reproductive organs, to be able to see the muscle in the very back of the abdomen. It proceeds down and forward, crossing the outer edge of each pubis, then moves back again to attach on a bony prominence of the inner upper posterior femur (thigh bone) called the lesser trochanter.
The psoas affects our posture and helps stabilize the spine. If it’s out of balance, it can be a significant contributor to low back and pelvic pain.
Along the way, the psoas picks up its synergist, the iliacus, which originates on the inner bowl of the pelvis (or the ilium) and joins the psoas on its path downward to attach to the femur. The two muscles work so closely together that they’re usually referred to as one, the iliopsoas. The other hip flexors include the sartorius, the tensor fascia lata, the rectus femoris, the pectineus, and the adductor brevis. Besides flexion, these muscles might also contribute to the internal or external rotation of the hip. This action is important for yoga practitioners to understand because the psoas may try to externally rotate the hip in poses where we don’t want external rotation, such as backbends or forward bends.
Although the psoas is one of the most important muscles in yoga poses, it is also one of the most misunderstood. Many students and even teachers have only a vague idea of where it is located. The psoas originates from the lumbar vertebrae and forms a strip of muscle almost as big as a wrist along each side of the spine. Looking at the front of the body, you’d have to remove the intestines and other digestive organs, as well as the female reproductive organs, to be able to see the muscle in the very back of the abdomen. It proceeds down and forward, crossing the outer edge of each pubis, then moves back again to attach on a bony prominence of the inner upper posterior femur (thigh bone) called the lesser trochanter.
The psoas affects our posture and helps stabilize the spine. If it’s out of balance, it can be a significant contributor to low back and pelvic pain.
Along the way, the psoas picks up its synergist, the iliacus, which originates on the inner bowl of the pelvis (or the ilium) and joins the psoas on its path downward to attach to the femur. The two muscles work so closely together that they’re usually referred to as one, the iliopsoas. The other hip flexors include the sartorius, the tensor fascia lata, the rectus femoris, the pectineus, and the adductor brevis. Besides flexion, these muscles might also contribute to the internal or external rotation of the hip. This action is important for yoga practitioners to understand because the psoas may try to externally rotate the hip in poses where we don’t want external rotation, such as backbends or forward bends.
Awakening the Psoas
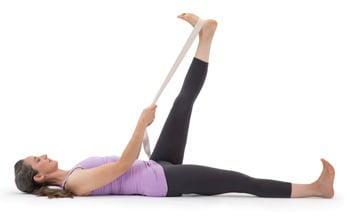 Now that you have a picture of the psoas in your mind, let’s see if you can feel it contracting. When the psoas contracts, it will pull the femur and the spine closer together (hip flexion). If you are lying on your back, contracting the right psoas will help lift your right leg off the floor as in supta padangusthasana, or reclining big toe pose. If the back of your leg is flexible, you may be able to bring it toward your torso past perpendicular, but the psoas stops contracting at about 90 degrees, when the leg is vertical. At that point, gravity is no longer pulling the leg back toward the floor, so the hip flexors can relax. On the other hand, if the back of your leg is tight and you can’t bring your leg to the 90-degree point, the psoas contracts the entire time you hold your leg up, even if you have a strap wrapped around your foot. By definition, this is an isometric contraction: the muscle is working, but not changing length. Anytime you’re holding a body part against the pull of gravity, it’s an isometric contraction.
Now that you have a picture of the psoas in your mind, let’s see if you can feel it contracting. When the psoas contracts, it will pull the femur and the spine closer together (hip flexion). If you are lying on your back, contracting the right psoas will help lift your right leg off the floor as in supta padangusthasana, or reclining big toe pose. If the back of your leg is flexible, you may be able to bring it toward your torso past perpendicular, but the psoas stops contracting at about 90 degrees, when the leg is vertical. At that point, gravity is no longer pulling the leg back toward the floor, so the hip flexors can relax. On the other hand, if the back of your leg is tight and you can’t bring your leg to the 90-degree point, the psoas contracts the entire time you hold your leg up, even if you have a strap wrapped around your foot. By definition, this is an isometric contraction: the muscle is working, but not changing length. Anytime you’re holding a body part against the pull of gravity, it’s an isometric contraction.Navasana
 Navasana is another yoga pose that strengthens the psoas isometrically. You can feel the basic action of the psoas in navasana while sitting on a chair. Sit tall on the front edge of the chair, with your arms stretched out in front of you, parallel to the floor. Then lean toward the back of the chair without touching it, while keeping your chest lifted. As soon as your body inclines backward past vertical, gravity is trying to pull your torso down toward the earth, and the psoas contracts to hold you cantilevered.
To apply this action in navasana, move to the floor and sit tall (up on your sitting bones, not rolled back on your tailbone) with your knees bent and feet flat. Wrap your fingers lightly around the tops of your shins and give a little pull to help lift your chest, then lean back until your elbows are straight. Let go of your shins, keeping your arms parallel to the floor, feet on the floor, and chest lifted. While this is a mild beginner’s version of navasana, you’ll be doing some nice isometric strengthening of the psoas as well as of your back and abdominal muscles.
Navasana is another yoga pose that strengthens the psoas isometrically. You can feel the basic action of the psoas in navasana while sitting on a chair. Sit tall on the front edge of the chair, with your arms stretched out in front of you, parallel to the floor. Then lean toward the back of the chair without touching it, while keeping your chest lifted. As soon as your body inclines backward past vertical, gravity is trying to pull your torso down toward the earth, and the psoas contracts to hold you cantilevered.
To apply this action in navasana, move to the floor and sit tall (up on your sitting bones, not rolled back on your tailbone) with your knees bent and feet flat. Wrap your fingers lightly around the tops of your shins and give a little pull to help lift your chest, then lean back until your elbows are straight. Let go of your shins, keeping your arms parallel to the floor, feet on the floor, and chest lifted. While this is a mild beginner’s version of navasana, you’ll be doing some nice isometric strengthening of the psoas as well as of your back and abdominal muscles.
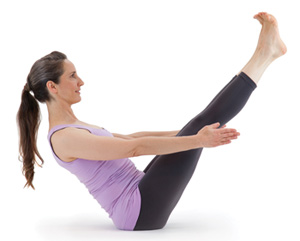 If you’d like to move into the full pose, tip your torso back a little farther, lift your feet off the floor, and find your balance. Even with your knees still bent, the psoas has to work harder, as it’s now holding up the weight of your torso plus the weight of your legs against gravity’s pull. You can stay here for several breaths, or go ahead and challenge the muscle even more by straightening your knees. In the full expression of navasana, the psoas acts like a guy-wire between your spine and the thighs to hold the beautiful V shape of the pose. This is a challenging pose, working not only the psoas, but also the abdominals, the back muscles, and the quadriceps; if you are a beginner, try working regularly on the preparatory steps to gradually build strength for the full variation.
Navasana is another yoga pose that strengthens the psoas isometrically. You can feel the basic action of the psoas in navasana while sitting on a chair. Sit tall on the front edge of the chair, with your arms stretched out in front of you, parallel to the floor. Then lean toward the back of the chair without touching it, while keeping your chest lifted. As soon as your body inclines backward past vertical, gravity is trying to pull your torso down toward the earth, and the psoas contracts to hold you cantilevered.
To apply this action in navasana, move to the floor and sit tall (up on your sitting bones, not rolled back on your tailbone) with your knees bent and feet flat. Wrap your fingers lightly around the tops of your shins and give a little pull to help lift your chest, then lean back until your elbows are straight. Let go of your shins, keeping your arms parallel to the floor, feet on the floor, and chest lifted. While this is a mild beginner’s version of navasana, you’ll be doing some nice isometric strengthening of the psoas as well as of your back and abdominal muscles.
If you’d like to move into the full pose, tip your torso back a little farther, lift your feet off the floor, and find your balance. Even with your knees still bent, the psoas has to work harder, as it’s now holding up the weight of your torso plus the weight of your legs against gravity’s pull. You can stay here for several breaths, or go ahead and challenge the muscle even more by straightening your knees. In the full expression of navasana, the psoas acts like a guy-wire between your spine and the thighs to hold the beautiful V shape of the pose. This is a challenging pose, working not only the psoas, but also the abdominals, the back muscles, and the quadriceps; if you are a beginner, try working regularly on the preparatory steps to gradually build strength for the full variation.Releasing the Psoas
After you’ve warmed and worked the psoas through contraction, it’s an ideal time to stretch and lengthen it. In order to stretch any muscle, we must do the opposite of its action; in this case, we’ll need to extend the hip, moving the lumbar spine and the femur away from each other. Because the psoas is a big and potentially strong muscle, you’ll be able to lengthen it most effectively by stretching one side at a time in poses such as anjaneyasana (lunge pose) and virabhadrasana I (warrior pose I), where the hip of the back leg is in extension.
After you’ve warmed and worked the psoas through contraction, it’s an ideal time to stretch and lengthen it. In order to stretch any muscle, we must do the opposite of its action; in this case, we’ll need to extend the hip, moving the lumbar spine and the femur away from each other. Because the psoas is a big and potentially strong muscle, you’ll be able to lengthen it most effectively by stretching one side at a time in poses such as anjaneyasana (lunge pose) and virabhadrasana I (warrior pose I), where the hip of the back leg is in extension.
Virabhadrasana I
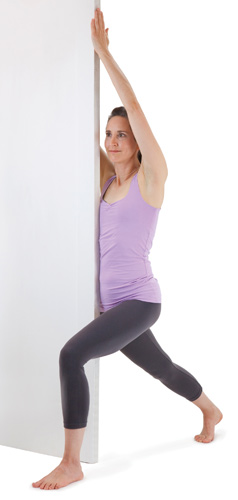 A good way to isolate the psoas stretch, whether you’re a beginner or an experienced practitioner, is to practice virabhadrasana I in a doorway. Find an open doorway (or a pillar) and step up close so that the right side of your body is just behind the door jamb. Step your left leg through the doorway, and place your right foot two to three feet behind you, with that back heel off the floor. Stretch your arms overhead and rest your hands on the wall. Bend both knees slightly, and align your pubic bones, navel, and breastbone with the door frame.
The whole key to stretching the psoas is in the tilting of the pelvis. Remember, a tight psoas tries to tilt the pelvis anteriorly (pulling the spine and top of the pelvis forward and down), so you must tilt the pelvis posteriorly to stretch the hip flexors. The door can help you achieve this action: simply move your pubic bones toward the door jamb, your upper pelvis and navel back away from the jamb, and draw your breastbone toward the jamb. These actions help you tilt the pelvis posteriorly, move the lumbar spine toward the back of the body (instead of letting the tight psoas pull it forward and down), and lift the rib cage vertically up out of the low back. Altogether, you’ll be lengthening the psoas and relieving compression and discomfort in the low back.
When you’re ready to deepen the stretch, straighten the back knee fully (let the back heel stay off the floor, especially if you’re a beginner or have knee or low back problems), and gradually bend the front knee more. If you’re not getting a deep stretch on the front of the right hip, redouble your efforts to bring the pubic bones toward the wall, and the navel away, and bend the front knee more. Hold the pose for a minute or more, keeping your breathing slow and steady to help the muscle relax into a deep stretch. Then repeat on the other side.
A good way to isolate the psoas stretch, whether you’re a beginner or an experienced practitioner, is to practice virabhadrasana I in a doorway. Find an open doorway (or a pillar) and step up close so that the right side of your body is just behind the door jamb. Step your left leg through the doorway, and place your right foot two to three feet behind you, with that back heel off the floor. Stretch your arms overhead and rest your hands on the wall. Bend both knees slightly, and align your pubic bones, navel, and breastbone with the door frame.
The whole key to stretching the psoas is in the tilting of the pelvis. Remember, a tight psoas tries to tilt the pelvis anteriorly (pulling the spine and top of the pelvis forward and down), so you must tilt the pelvis posteriorly to stretch the hip flexors. The door can help you achieve this action: simply move your pubic bones toward the door jamb, your upper pelvis and navel back away from the jamb, and draw your breastbone toward the jamb. These actions help you tilt the pelvis posteriorly, move the lumbar spine toward the back of the body (instead of letting the tight psoas pull it forward and down), and lift the rib cage vertically up out of the low back. Altogether, you’ll be lengthening the psoas and relieving compression and discomfort in the low back.
When you’re ready to deepen the stretch, straighten the back knee fully (let the back heel stay off the floor, especially if you’re a beginner or have knee or low back problems), and gradually bend the front knee more. If you’re not getting a deep stretch on the front of the right hip, redouble your efforts to bring the pubic bones toward the wall, and the navel away, and bend the front knee more. Hold the pose for a minute or more, keeping your breathing slow and steady to help the muscle relax into a deep stretch. Then repeat on the other side.
A good way to isolate the psoas stretch, whether you’re a beginner or an experienced practitioner, is to practice virabhadrasana I in a doorway. Find an open doorway (or a pillar) and step up close so that the right side of your body is just behind the door jamb. Step your left leg through the doorway, and place your right foot two to three feet behind you, with that back heel off the floor. Stretch your arms overhead and rest your hands on the wall. Bend both knees slightly, and align your pubic bones, navel, and breastbone with the door frame.
The whole key to stretching the psoas is in the tilting of the pelvis. Remember, a tight psoas tries to tilt the pelvis anteriorly (pulling the spine and top of the pelvis forward and down), so you must tilt the pelvis posteriorly to stretch the hip flexors. The door can help you achieve this action: simply move your pubic bones toward the door jamb, your upper pelvis and navel back away from the jamb, and draw your breastbone toward the jamb. These actions help you tilt the pelvis posteriorly, move the lumbar spine toward the back of the body (instead of letting the tight psoas pull it forward and down), and lift the rib cage vertically up out of the low back. Altogether, you’ll be lengthening the psoas and relieving compression and discomfort in the low back.
When you’re ready to deepen the stretch, straighten the back knee fully (let the back heel stay off the floor, especially if you’re a beginner or have knee or low back problems), and gradually bend the front knee more. If you’re not getting a deep stretch on the front of the right hip, redouble your efforts to bring the pubic bones toward the wall, and the navel away, and bend the front knee more. Hold the pose for a minute or more, keeping your breathing slow and steady to help the muscle relax into a deep stretch. Then repeat on the other side.
Setu Bandha Sarvangasana
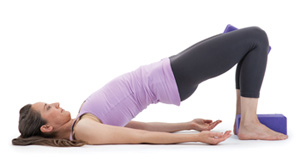 Now that you’ve stretched your psoas, you’re ready to work on backbending poses, which require full extension in both hips. In setu bandha sarvangasana, for instance, tight and short psoas muscles will tilt the pelvis anteriorly as you lift your pelvis off the floor, causing sharp compression in the lower lumbar vertebrae. So it’s important to prepare your body for backbending by first stretching the hip flexors, especially if you lead a sedentary lifestyle.
When you’re ready to work on bridge pose, lie on your back with the knees bent and the feet flat on the floor, hip-width apart, heels pulled in close to your sitting bones. Place a block between your feet, grounding down through the big toe and inner heel, and squeeze a second block between your knees. The blocks ensure that your thighs remain parallel throughout the pose to prevent the psoas muscles from externally rotating the hips while extending them, which can contribute to low back compression and knee pain.
Now that you’ve stretched your psoas, you’re ready to work on backbending poses, which require full extension in both hips. In setu bandha sarvangasana, for instance, tight and short psoas muscles will tilt the pelvis anteriorly as you lift your pelvis off the floor, causing sharp compression in the lower lumbar vertebrae. So it’s important to prepare your body for backbending by first stretching the hip flexors, especially if you lead a sedentary lifestyle.
When you’re ready to work on bridge pose, lie on your back with the knees bent and the feet flat on the floor, hip-width apart, heels pulled in close to your sitting bones. Place a block between your feet, grounding down through the big toe and inner heel, and squeeze a second block between your knees. The blocks ensure that your thighs remain parallel throughout the pose to prevent the psoas muscles from externally rotating the hips while extending them, which can contribute to low back compression and knee pain.
By incorporating poses that strengthen and lengthen the psoas, you can release habitual muscle-holding patterns, improve your low-back alignment, and create a more balanced posture.
When you begin to lift your pelvis off the floor, lift your tail-bone first. This simple action sets the pelvis into a posterior tilt, and, if your hip flexors are lengthened enough, helps you keep space in your low back. As you continue to roll up into bridge pose, press your pubic bones up into the skin of your lower abdomen. Hold the pose for 20 to 30 seconds. Repeat the pose two more times; as the hip flexors lengthen, you may find that you can go deeper and lift higher.
A well-balanced asana practice helps keep your muscles strong enough to do their job and flexible enough to allow full range of motion of associated joints. By incorporating poses that both strengthen and lengthen the psoas, you can release habitual muscle-holding patterns, improve your low-back alignment, and create a more balanced and spacious posture.

Now that you’ve stretched your psoas, you’re ready to work on backbending poses, which require full extension in both hips. In setu bandha sarvangasana, for instance, tight and short psoas muscles will tilt the pelvis anteriorly as you lift your pelvis off the floor, causing sharp compression in the lower lumbar vertebrae. So it’s important to prepare your body for backbending by first stretching the hip flexors, especially if you lead a sedentary lifestyle.
When you’re ready to work on bridge pose, lie on your back with the knees bent and the feet flat on the floor, hip-width apart, heels pulled in close to your sitting bones. Place a block between your feet, grounding down through the big toe and inner heel, and squeeze a second block between your knees. The blocks ensure that your thighs remain parallel throughout the pose to prevent the psoas muscles from externally rotating the hips while extending them, which can contribute to low back compression and knee pain.
By incorporating poses that strengthen and lengthen the psoas, you can release habitual muscle-holding patterns, improve your low-back alignment, and create a more balanced posture.
When you begin to lift your pelvis off the floor, lift your tail-bone first. This simple action sets the pelvis into a posterior tilt, and, if your hip flexors are lengthened enough, helps you keep space in your low back. As you continue to roll up into bridge pose, press your pubic bones up into the skin of your lower abdomen. Hold the pose for 20 to 30 seconds. Repeat the pose two more times; as the hip flexors lengthen, you may find that you can go deeper and lift higher.
A well-balanced asana practice helps keep your muscles strong enough to do their job and flexible enough to allow full range of motion of associated joints. By incorporating poses that both strengthen and lengthen the psoas, you can release habitual muscle-holding patterns, improve your low-back alignment, and create a more balanced and spacious posture.
The Psoas: is It Killing Your Back?
Feb 18th, 2008 by Mehdi |
This is a guest post by Lauren, Australian Fitness Instructor and Personal Trainer. Lauren has a degree in Human Movement and plays Volleyball professionally in Europe. She blogs at Laurensfitness.com.
People from all ages, occupations, and sport disciplines complain of low back pain. A tight Psoas often contributes to your back pain. Good News? You can avoid it… you can even fix it.
Where and What is My Psoas? The Psoas is one of the largest and thickest muscles in the body. It attaches to the vertebrae of your lower back, and the head of your femur (thigh bone).
The Psoas is primarily responsible for hip and thigh flexion and has a lot of influence over your lumbar posture and the way your hips are positioned.
When you’re sitting for a prolonged period of time, your Psoas is in a shortened position. Leave it for long enough, and it will start to think this is normal. Your tissues want to move into that resting position. Leaving you tight & contracted.
Incorrect posture during standing and walking (which is often caused by a tight Psoas) will leave it even tighter and harder to loosen.
Why Does It Cause Back Pain? A tight Psoas is a killer for your back for various reasons.
- If it is tight and in a contracted state, your Psoas will want to bring your lower back forward, moving you into an anterior tilt: lordotic posture.
- The pressure exerted by the Psoas whilst in a contracted state can compress the joints and discs of the lumbar vertebrae. This pressure causes degeneration and will make them more susceptible to injury.
- A shortened Psoas on one side will pull the spine or pelvis to that side, leading to many painful problems, including scoliosis.
- A tight Psoas will stop your Glutes firing and activating normally. This is Reciprocal Inhibition: the Psoas and the Glutes are opposing muscles.
Lack of Glute activity plus horrific posture can lead to overcompensation in other muscles of the back, leaving them tight and overworked. Couple this with the referring pain from the trigger points in your Psoas and you will be hurting.
Tips to Avoid A Tight Psoas. There are several ways to stop your Psoas turning into a hazardous plank of wood. All of which are easy to implement and should be even if you don’t suffer from back pain yet. Here goes…
- Postural Corrections. If we stay in a certain position all day, our tissues will want to move into that resting position, in this case, your Psoas. The best sitting posture is one that always changes.
- Sit Back in Your Chair. This will stop you leaning forward as much, and thus your Psoas won’t be in as shortened position in comparison to when you sit on the edge of your seat.
- Stop Hooking Your Feet under Your Chair. You put yourself in more hip flexion and therefore, more Psoas activation. Set your feet flat on the floor, or a raised platform if you are a shortie.
- Stand Up When Performing Exercises. You sit all day at work and keep your Psoas shortened. Do the opposite in the gym. Instead of the bike, get on the treadmill. Sub in Overhead Press instead of Seated Press.
- Stop Sleeping on Your Stomach. When you are on your stomach, your back goes into hyperextension. This is exacerbating what a tight Psoas already does to your back (anterior tilt). Change it up.
- Move More. Not staying in a seated position all day will go a long way to stopping you developing a tight Psoas. Get up more frequently, stretch more often, change positions… just keep moving!
Tips To Loosen A Tight Psoas. If you do suffer from low back pain and you suspect a tight Psoas, relax (maybe your Psoas will follow the lead), read the next few tips, and get cracking.
1. Stretch. Add Psoas and Hip Flexor stretches after your workouts. Get out of your chair at work occasionally and do some stretches. Do some at night before you go to bed. You can do this one:

2. Release. The most effective way to loose your Psoas is through a therapist. But you can do it yourself using a ball slightly larger & softer than a tennis ball. This massage technique releases your Psoas through an active range of motion.
- Lay on the ball, about 1-2 inches outside your belly button.
- You’ll feel your Psoas respond as you lower yourself. It will hurt a little.
- Arch your back; come up onto your elbows. This will result in a more forceful stretch and release on your Psoas.
3. Activate Your Glutes. Active glutes will help inhibit and relax your Psoas. Here are my favorites exercises you can integrate into your warm-up, or do in your main program to help fire up your glutes and loosen your Psoas.
- Overhead Lunges. Stretch and glute exercise.
- Single Leg Bridge with Knee lift. Lifted knee stretches opposite Psoas.

A tight Psoas will give many more problems than I have outlined here. It’s easy to prevent them getting tight and there is a lot you can do about it if it does.
Generally, during everyday life, at the workplace and even at the gym people are performing movements that promote Psoas tightness. Start taking some notice and prevent these troublemakers from giving you pain.
Lauren blogs about fitness, strength training and nutrition at Laurensfitness.com.Check out her articles about hip flexor flexibility, foam rolling and the glycemic index.
http://www.yogajournal.com/practice/169

The internal awareness that develops through yoga is the most important tool for learning to release thepsoas. And releasing the psoas will bring new freedom, ease, and structural integrity to your yoga practice.
It can be difficult at first to access the subtle sensations of the psoas. Buried in the body, engaged in habitual patterns of holding (especially when you're sitting or standing), and deeply linked to your emotions, the psoas is best approached with quiet
attention, patience, and perseverance. Awareness is the first key. Like a flashlight that illuminates the contents of a dark closet, you can use your attention to clarify and define each sensation in your core.
Constructive Rest Position
Rather than trying to instantly correct all the imbalances and habitual compensations you've developed throughout your life, we'll begin by simply releasing the psoas in a posture called constructive rest position. In this pose, you don't need to perform any muscular action to release the psoas. Gravity will do the work.
To take constructive rest position, lie on your back, bend your knees to about 90 degrees, and place your feet on the floor in line with your hip sockets, 12 to 16 inches from your buttocks. Be careful not to flatten or exaggerate the curves in either your lumbar (lower back) or cervical (neck) spine. Rest your hands and forearms on your rib cage, on your pelvis, or by bringing them to the floor as in Savasana.
Now that you're in position, shift your awareness to the support of your bones. Begin by sensing the weight of your bones sinking down toward the floor. Take note of any part of your skeleton that feels as though it is suspended, any place where the muscular contraction prevents the bones from surrendering to the pull of gravity. As your psoas continues to release, the distribution of weight will start to feel increasingly even throughout your body.
Active Supine Stretch
Once you've begun to understand the skeletal position and internal sensations that accompany releasing the psoas, you can move on to more actively lengthening the muscle. Starting from constructive rest position and keeping both knees bent, bring your right upper thigh toward your chest. Gently hug your right leg toward your trunk.
Be very careful not to curl your pelvis up off the floor as you move your right leg; the pelvis should remain aligned with the trunk. Sensing into your flexed right hip and softening in the hip socket will help free the right thighbone.
You're now ready to stretch your left psoas. Very slowly walk the left foot farther away from the hips. As the leg extends, keep your awareness on the front of the left hip socket, releasing any psoas tension you notice there. Once you begin to sense the psoas lengthening, follow the sensation all the way up the muscle to its attachment at the 12th thoracic vertebra, located behind the center of your solar plexus.
To amplify the stretch, push your right leg against your right arm as though you were gently kicking up toward the sky. At the same time, resist the push of the leg with your clasped arms. After a few moments, change sides. Don't continue this pose if you experience pain or tension in your lower back. Instead, immediately go back to constructive rest position and relax, allowing gravity to release your psoas again.
The Ultimate Stretch
All variations of the lunge (sometimes called "runner's stretch") and Pigeon Pose are excellent for stretching the psoas, but for many students the best is a modified Pigeon Pose (Eka Pada Rajakapotasana). When you stretch one leg out in front of you and one behind you while keeping your pelvis stable, you isolate the stretch in the psoas and iliacus muscles attached to the back leg.
To come into this pose, start by kneeling on all fours. Swing your right knee forward onto the floor between
your hands, releasing and rotating the right femur within the right hip socket, and bring your right buttock toward the floor. At the same time, extend your left leg straight back behind you. Make sure you keep your hips level and squared to the front. If necessary, place a firm bolster or pile of blankets under your right sitting bone to keep your pelvis level and supported. Don't bring your right buttock to the floor by torquing your right hip farther forward or farther toward the floor than your left.
This posture stretches your left psoas. As you continue to extend back through your left leg, check again that you are keeping your pelvis facing squarely forward. If the pelvis torques, you'll lose the psoas stretch, and you may also compress or overtwist the lower back. If you're stretching properly, you shouldn't feel tension in your lower back.
The release and stretch should begin where your psoas crosses your hip at the front of the joint, and you should feel an upward extension through both the front and back of your trunk. The line of your body should form a continuous arc, with no abrupt angles.
Seated Poses
Now that you've discovered how it feels to release and lengthen your psoas, we'll use a simple cross-legged posture to illuminate the proper use of the psoas in seated asanas.
Sit on a firm, folded blanket, with your feet and lower legs off the blanket. Bend your right leg and draw the heel toward your left inner groin. Similarly, bend your left leg and draw the heel toward your right shin. If either of your knees feels strained or if one knee is higher than the other, support that knee by placing a rolled towel or blanket or bolster under the knee or thigh.
Begin to notice where the weight of your torso grounds through your pelvis into the floor. Does most of your weight fall behind your sitting bones, or in front of them? If you sense your weight grounding directly through the bones, refine your questioning. Is your weight more on the front of the bones or the back? Lift your sitting bones off the blanket and pull back on the muscles of the buttocks, so that when you lower down again you shift more firmly onto the front of your sitting bones. See if this action provides a more effortless base of support for your spine, rib cage, and head.
To align your pelvis properly, you may have to raise your sitting bones by placing flat, firmly folded towels or blankets under your buttocks. When you get all your props placed correctly, you'll be on the front of your sitting bones, with your knees lower than your hip socket. This relationship between knees and hips is critical in all seated postures because it allows your psoas to open at the front of the hip; in turn, this opening allows a release of tension throughout your legs and lower back. As the weight of the body releases down through the bones, it grounds into the earth, and a subtle sensation of support rebounds upward.
When your pelvis is stable and your skeletal structure is free to align properly, sitting feels effortless. You shouldn't have to use muscular tension to hold yourself up—
thrusting your chest forward or pulling your shoulders back to lengthen your trunk. If you feel as though your spine collapses without these actions, if your weight is still placed behind your sitting bones, or if your knees are still higher than your hip sockets, continue to add towels or blankets until you find the sensation of support that accompanies proper alignment.
If you still don't feel this support even though you're aligned properly, try shifting your weight slightly forward through your hip sockets until you feel a release at the core of your body. At first, this release may feel a little unsettling. You may even experience a subtle fear of falling. As the psoas lets go, you are shifting from a familiar feeling of controlling your posture with muscles to an unfamiliar feeling of relying on your skeleton for support.
Since it's new, the sensation may feel a bit scary—or you may feel relief as you let go of unnecessary muscular contraction.
Standing Release
Maintaining a released psoas can be challenging in standing postures. Biomechanically, standing on two legs is a very complex task, and many of us have developed habitual—but less than optimal—patterns of muscular contraction to help keep us upright. Fortunately, there's an excellent exercise that allows you to discover what it feels like to relax your psoas while standing.
Take a block or thick book and place it 12 to 16 inches away from a wall. Stand on the block or book with your left foot, supporting and balancing yourself with your right hand on the wall. Let your right leg and foot hang completely released. Gently swing this leg back and forth like a pendulum, taking care not to let the trunk bend or twist as your leg swings. (If your pelvis is torquing, you're going beyond the released range of motion of your psoas.) See if you can sense the pendulum movement deep within your torso; it should begin at the very top of your psoas at your 12th thoracic vertebra, behind your solar plexus.
After you swing the leg for a few minutes, step down from the block and see if your two legs feel different. You've released the psoas attached to the swinging leg, and most likely this leg will feel longer, freer, and more relaxed.
Now reverse your position and swing the other leg. This time focus not only on the leg you're swinging, but also on the standing leg. Check to make sure you're not leaning into the standing leg hip. Try to sense your weight passing directly down through your leg and foot and into the block. Even though this leg is now bearing weight, you can release the psoas by bringing your awareness to the front of the hip socket and softening any tension you notice there.
Tadasana (Mountain Pose)
Now let's investigate Tadasana (Mountain Pose). Stand with your feet directly underneath your hip sockets, and conduct an inquiry of your sensations. Does your pelvis feel like a stable foundation? Is the rim of your pelvis parallel to the floor? You can check by looking in a mirror, or by placing your hands on top of your hips and following the pelvic rim around to the front of your body, checking to see if both hands are level. Do both your legs transfer weight equally? Are you grounding equally through both feet? If your answer to these questions is "Yes," your psoas should feel released, and you should be able to sense gravity drawing your weight down through your bones. If your bones are aligned, you'll feel a slight sensation of rebounding from the earth, just as a ball dropped to the floor bounces up again. This rebounding force creates a current of energy that aligns the body, flowing up through your spine and out the top of your skull. If your pelvis doesn't feel stable and even, try returning to constructive rest position and the supine psoas stretch. After a few minutes of releasing the psoas and stabilizing the pelvis, return to Tadasana and see if you feel more balanced.
Vrksasana (Tree Pose)
Once your weight feels equal on both feet in Tadasana, focus on sensing your ankles. Shift your weight ever so slightly forward and back over your ankle joints until you find the place where they feel most released. At that point, your psoas is also most free to release and to assume its proper function as a guy wire for the spine. Moving with proper alignment from Tadasana into Tree Poserequires that you continue to sense this connection between your standing leg and your spine, even as you shift all your weight onto one leg and lift the other into the air.
When you're ready, gradually shift from grounding your weight through both legs to bringing it all onto your right leg. A common mistake in this asana is leaning into the right hip, which can strain the hip ligaments on that side. Instead, balance your weight directly over the bones of your leg, allowing the hip socket to remain released and the right-side psoas to relax.
When you can ground your weight straight down through your right leg, without leaning into your right hip or locking your right knee, you can start to turn and lift your left leg. Begin by softening any tension at the front of the left hip socket, releasing the left psoas. Then rotate the thigh bone in the left hip socket, contracting the external rotator muscles located behind the hip. Once you've rotated the femur, lift your left leg, placing the sole of the foot as high as possible on the inner right leg. Again, make sure you didn't lean into your right hip as you lifted the left leg. If necessary, place your hand on a wall or chair to help you maintain balance.
Psoas and the Arms
If you feel stable and aligned standing in Vrksasana, you can add your arms to the pose. Just as your legs should be able to move independently of your pelvis, your arms should be able to move independently of your shoulders. And, as with your legs, this independent motion can only occur if your psoas is released. To avoid contracting your psoas as you raise your arms, bring your attention to your solar plexus and the back of your rib cage. Melt any rigidity you feel in these areas. Aim to soften and widen equally across the front of your chest and across your back, especially in the area between your shoulder blades. If these regions already feel open, straighten your arms, rotate them outward, and sweep your palms up above your head. If you detect any stiffening in the area of your upper psoas, pause and take your arms a little lower until you can soften the tension you sense in this area. Bringing your arms over your head can challenge the release of the upper psoas where it attaches to the 12th thoracic vertebra, and it can also challenge your stability through your standing leg. To maintain ease at the core of your body, focus on sensing a downward release from the very top of your psoas. Feel your weight dropping down through your bones, even as your arms float up over your head.
If you have difficulty sensing this release, return again to constructive rest position, with your arms at your sides. After a few moments, fold your arms across your rib cage. With this extra weight, the middle of your torso will rest a little more into the floor; you will feel an increased release deep in your trunk as the top portion of your psoas lets go. Once you've identified this release, you can again investigate it in Vrksasana.


 natural looking pools and a small waterfall that melts into the nature. Thats a perfect place to go for a dip when the day gets too hot.


 To flush out any germs, pollen, dust, or congestion that have accumulated overnight, try jala neti, a nasal cleansing technique that rinses the sinuses with warm saline with the aid of a teapot-like vessel called a neti pot. Jala neti is a nice prelude to a morning pranayama or meditation practice. According to yoga tradition, it equalizes the flow of breath between the nostrils and balances the ida and pingala nadis—two energy channels that pave the way for inner exploration.


