Group classes , private classes and corporate classes .
Beeda Christina Gautier.
certifications by:-
1. Ananda Marga Yoga
2. Malaysian Association of Yoga Instructors
beedagautier@gmail.com
016-8326811
(available on whatsapp)

Monday, October 13, 2014

Plank / Chaturanga

You CAN Do A Perfect Push-Up! Here's How
As a group fitness instructor, telling my classes it's time for push-ups sometimes results in a collective groan. Push-ups aren’t easy, but they are powerful.
They're a good indicator of overall strength and as we age, we lose about a half pound of muscle a year (after the age of 35) if we aren’t actively replacing itSo at the very least, push-ups will help you maintain muscle and strength.
Not only do they work your upper body (chest, arms and shoulders), but done correctly, they also strengthen your core, butt and quadriceps. With a push-up plan, you can build strength, track your progress and increase the number of reps you are able to do, even if you can only do one today.
Plus, you can do push-ups anywhere — all you need is your own body weight!
How To Have Great Push-Up Form
To prevent injury and ensure you work your muscles effectively, technique is important.
Place your feet and hands in the correct position: For a traditional push-up, your hands should be slightly wider than shoulder-width apart, hands facing forward. Your feet should be directly behind you, slightly apart. You can keep your feet further apart for increased stability until you get comfortable putting them closer together.
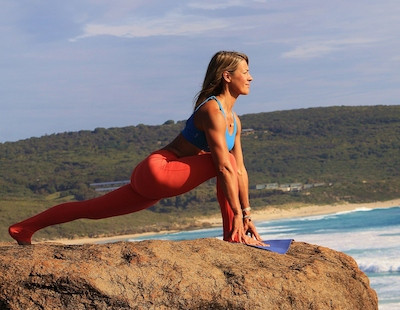
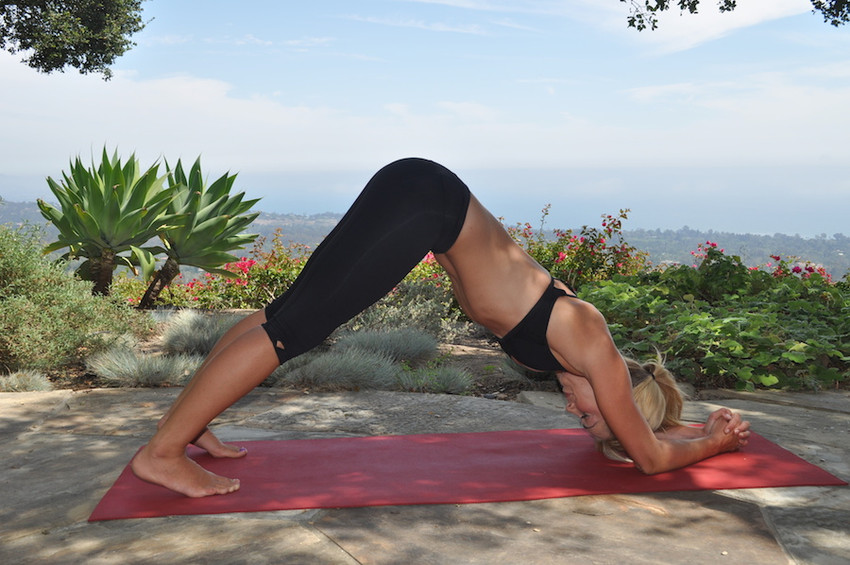
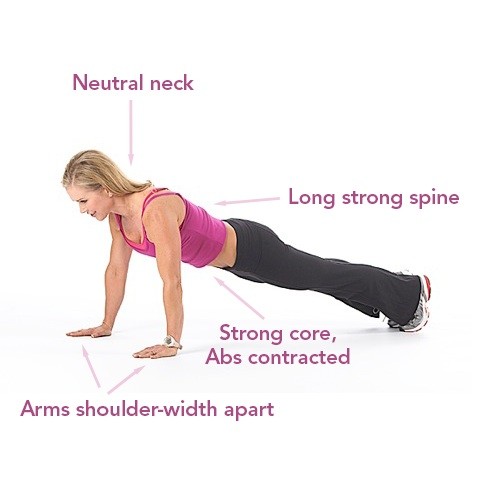
Think plank position when doing push-ups: To have the right technique, you want your body to be like a straight line or plank — no butt up in the air and no dropped or cranked back head. Aim for a straight line from the top of your head down through your heels. Engage your abs (photo above, left).
Slowly lower your body: With your arms straight, glutes and abs contracted, lower your body slowly toward the ground. Aim to keep your core body steady and don’t sag through your low back. (Remember to keep your butt down!)
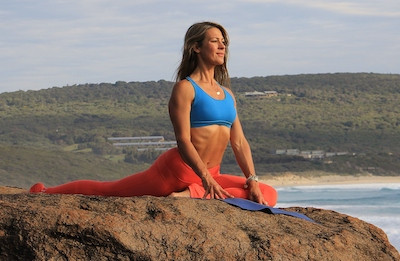
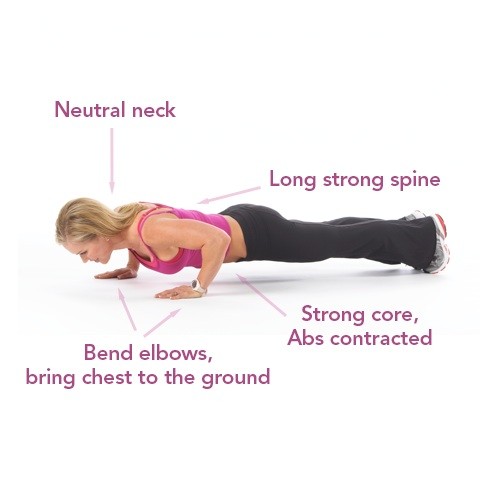
Use a full range of motion: Make sure you go all the way down so your chest is near the ground or your arms are at an approximate 90-degree angle. Keep your body aligned and make sure your butt isn't up in the air (photo below, left).
Only do as many as you can while keeping good form: If your form starts to slip, it’s time to stop. Each day you can try to add one more push-up to your routine and work up to doing more. Set a goal for yourself. If you can only do one now, set a goal and work your way up to doing a set of 10.
How To Work Your Way Up To A Full Push-Up
If you’ve never tried push-ups before or if doing just one is a challenge for you, that’s OK! Remember, push-ups aren’t easy, so work up to doing a full one. Start with wall push-ups and once you have those mastered, move on to elevated push-ups and once those are a snap, move on to modified push-ups. Here’s how!
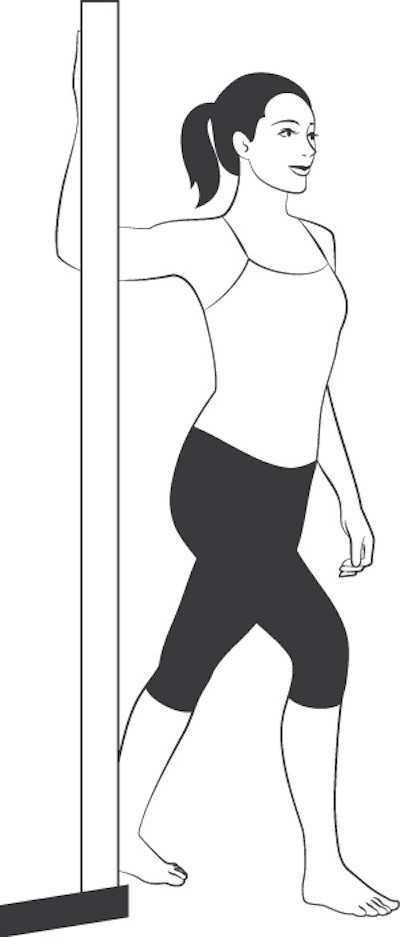
Step One: Wall Push-Ups
Set your hands on a wall at a width that’s wider than shoulder-width apart. Walk backward with your feet away from the wall until your arms are fully extended.
Lean into the wall and keep the rest of your body in a straight line. Lower yourself toward the wall until your nose almost touches the wall, and push back up to the starting position.
Add a few repetitions each day for a week or two. Once you are up to 50 in a row with good form, move to the elevated push up.
Step Two: Elevated Push-Ups
Place your hands onto a sturdy table, chair or bench. If you start out with something as tall as a kitchen table, try to decrease the incline every few days and move down to a chair or a step. Follow the regular push-up form (on your inclined surface) and do as many in a row as you can with good form.
Practice for a week or two adding a few reps each time. Once you can do 30-50 elevated push-ups, progress to the modified push-up.
Step Three: Modified Push-Ups
Begin with hands on the floor, wrists below your shoulders, glutes and abs engaged, knees on floor. Do a full range of motion with your chest coming down to the floor and then push back up.
Add a few modified push-ups every day and once you are up to doing at least 30-50 in a day, you are ready for full push-ups on your toes.
Are you a newbie? Try this push-up challenge: For one month straight, add one push-up a day. Start Day 1 with 1 push-up. By day 30, you should try for 30 push-ups in a row. If you are modifying, that’s OK, just also add the challenge of working up to your toes. Record your progress on a calendar or make a chart.
Dare I say you will soon be on your way to the groan-free push-up zone? With this plan, you will be truly impressed with your progress and how you can significantly build up your own strength.
http://www.mindbodygreen.com/0-15622/you-can-do-a-perfect-push-up-heres-how.html

Thursday, October 9, 2014

Tips to Improve Your Digestion

theartofdigestion

The Art of Digestion: Ayurveda’s Key to Perfect Health

by: Chef Johnny Brannigan
In a world of advancing discovery and development, one eye-opening statistic is that Americans today use more medications than in any other country in the world. With all of our progress and evolution, the luxury of health still eludes us.
While this cultural situation spirals in an “out of control” fashion, many individuals seek to expand their awareness and quality of life with knowledge, health regimens, diets, Eastern spiritual practices, herbal medicine, and more. The natural desire is to experience more well-being physically, mentally, emotionally, and spiritually while we pursue a successful life.
More people in the West are discovering the mother of all health care systems in Ayurveda, whose origins are said to be more than 5,000 years old, and from which all healing systems can trace their roots.
Ayurveda—much more than just herbal remedies—identifies each person’s unique mind-body type, explaining in detail the effects of all foods, weather, daily habits, toxins, and emotions for our unique constitution. According to Ayurveda, the most significant factor in our overall health is the quality of digestion.
Good digestion will not only ensure prevention of disease, but ultimately lead to the creation of healthy tissues with feelings of lightness and energy. In fact Ayurveda goes further in defining the ultimate product of digestion produces an essence known as Soma, a particle which is described as bliss. This particle becomes a wave of consciousness itself. Therefore the end product of food and healthy digestion is the consciousness of bliss, known in Sanskrit as Sat Chit Ananda.
So how do you find your way to healthy digestion and feelings of lightness, energy, and bliss?

14 Tips to Improve Your Digestion

  1. Practice meditation, quiet time, or deep prayer on a daily basis. Stress inhibits proper digestion and can be dissolved through deep and regular meditation.
  2. Exercise regularly or do yoga. Exercise strengthens the muscles, joints, and spine, tones the organs, increases blood flow, and improves mood. All of these benefits will improve digestion, absorption, and elimination.
  3. Eat at regular times of day, allowing time to fully digest the previous meal before you begin the next one.
  4. Eat the largest meal at lunchtime before 2:00 p.m. and avoid eating late at night. Finish eating by 7:00 p.m. Eating before sleep will tend to produce toxins and dullness in the system.
  5. Eat slowly, observing with awareness what you are feeling, and avoiding distractions such as TV or computers while you eat.
  6. Eat foods that balance your mind-body constitution, or dosha type.
  7. Use spices that kindle Agni, the digestive fire, like ginger, black pepper, and cumin.
  8. Consume whole, chemical-free, and organic foods that are fresh and vibrant whenever possible.
  9. Avoid preservatives, canned food, genetically modified foods, leftovers, and cold, iced drinks.
  10. Sip hot water throughout the day.
  11. Eat less meat, cheese, and fried food, as they are more difficult to digest.
  12. Occasionally rest your digestion with either a short fast where you consume only liquids (like soup, juice or water) for one day. After the fast, gently transition back to eating whole foods, starting with soup.
  13. Process and release trapped emotions regularly.
  14. Aim to eat foods cooked by someone who loves you! Love is the most important ingredient in food. Every good chef knows this.
If you're interested in cooking for healthy digestion, check out these three recipes from Chef Johnny, great for balancing the doshas and improving digestion. 


About the Author

Chef Johnny Brannigan

Chef Johnny Brannigan is an international Ayurvedic vegetarian and vegan chef with a deep knowledge base in Vedic wisdom and holistic medicine, and a lifelong love of food and cooking.

Trained in Ayurveda and as a teacher of meditation by the Maharishi in Switzerland and Thailand, he has cooked and taught in over 33 countries, writing new recipes as he travelled.
- See more at: http://www.chopra.com/ccl/the-art-of-digestion-ayurvedas-key-to-perfect-health?utm_content=CCL%20Newsletter%20141008&utm_campaign=October&utm_source=Newsletter&utm_medium=email#sthash.MIyXIuDW.dpuf

Cancer-Fighting Foods

7 Top Cancer-Fighting Foods

by: Melania Lizanol
One of the most concerning things I’ve heard in my medical practice, was when a cancer patient asked her doctor what she should eat during her treatment, and her physician answered, “you can eat anything you want.” He couldn’t have been more wrong.
Because we truly are what we eat, during times of challenge for the mind or body, nutrition is one of the most important factors that allow the body to heal. When we talk about cancer-fighting foods, we must consider three ways in which food helps our system defend itself:
1. Foods That Reduce Inflammation: Inflammation has been associated with many chronic diseases like atherosclerosis, arthritis, osteoporosis, Alzheimer’s disease, and many types of cancer. Nutrition is a powerful way to protect our cells from inflammation.
2. Foods That Prevent Cellular Damage: Antioxidants have a powerful effect on our immune system and help to prevent disease. They do this by fighting free radicals, which are a byproduct of normal cellular function but they can produce cellular and DNA damage when they accumulate. This occurs during times of stress to the body, like physiological change, emotional stress, and physical disease.
3. Detoxifying Foods: These foods help the body’s natural detox organs to eliminate toxins and residue.

Phytonutrients = The Magic Ingredient

The majority of nutrients that have anti-inflammatory, anti-oxidant, and detox properties are found in plants. Plant foods—like fruits and vegetables—contain macronutrients (complex carbohydrates, proteins, fats, and fiber,) and micronutrients (vitamins and minerals). But they are also packed with compounds known as phytonutrients. Simply put, phytonutrients are active compounds that benefit humans, particularly in the area of cancer prevention. Phytonutrients can lower the risk of cancer, the side effects of cancer treatments, and reduce other health risks and problems.
Phytonutrients provide plants with sensory characteristics such as their color, flavor, and smell, but they also protect plants from damage—this is why they’re so powerful. Most cancer-fighting foods have more than one phytonutrient, so their benefits are not limited to one area among the benefits of anti-inflammatory, anti-oxidant, or detoxifying.
Here are seven foods that have a powerful impact on fighting cancer.

Kale

Kale is rich in fiber, which helps improve digestion, and a healthy digestive system is key to maintaining whole health. Kale also contains iron that helps transport oxygen, enhance cell growth, and promote proper liver function.
The amount of vitamin K and omega-3 fatty acids in kale gives it anti-inflammatory properties: one cup/ day gives 10 percent of the RDA recommendation for omega-3 fatty acids. It has vitamin A and calcium—even more than milk—so it helps prevent osteoporosis (which can be a side effect of some anti-cancer treatments).
It’s also considered a detox food because of its content of fiber and sulfur. Sulfur is an important part of many liver enzymes that help eliminate toxins or drugs.

Papaya

Papaya fruit has a high content of vitamins C, E, and beta-carotene, which are potent antioxidants. It also contains a protein-digesting enzyme called papain, so it enhances digestion, which can be impacted during treatment.

Berries

Berries are packed with polyphenols like tannic acid and ellagitannin, which stimulate the elimination of carcinogens and inhibit cancer growth. Blueberries have one of the highest antioxidant capacities among all fruits. They have favanols, anthocyanins, and hydroxycinnamic acids, as well as other phytonutrients like resveratrol; all are very potent anti-oxidants.
Plus, berries are easy to consume—add them to whole grain cereal, smoothies, or yogurt.

Whole Grains

Whole grains—like quinoa and oats—provide fiber, vitamins, and minerals that help prevent cardiovascular disease. But recent research shows that their content of phytonutrients give them the capacity to prevent some types of cancer. They contain ferulic and ellagic acids; these are anti-oxidants that block free radicals, but can also protect cells from radiation damage.

Green Tea

Green tea has many health benefits that researchers believe are related to the phytochemicals it contains. Of these phytochemicals, the catechins are the most studied in cancer patients. Catechins are also found in other fruits like apples, grapes, and avocadoes. The benefits of green tea include the reduction of vascular neo-formation, a phenomenon necessary for the reproduction of cancer cells. It contains potent antioxidants and is helpful to detoxify and assist the liver in eliminating toxins.
It’s important to notice that black tea is fermented, and this process partially eliminates the catechin content. Remember that a 10-minute infusion of green tea is necessary for the catechins to be liberated.

Cruciferous Vegetables (Broccoli, Brussel Sprouts, Cauliflower)  

Cruciferous veggies have anti-cancer properties because of their content of phytonutrients like sulforaphane, flavonols, and kaempherol, all, which reduce oxidative stress (cellular damage due to free radicals and peroxides). Broccoli also contains vitamin C, which is a potent anti-oxidant.

Tomatoes

The lycopene content in tomatoes has been associated with increased survival rates in prostatic cancer patients, and a decreased risk of suffering from this type of cancer. Lycopene is a potent antioxidant, but tomatoes also have a group of compounds called “ the red family” and the combined action of all these contents, make them efficient in preventing cancer.
Other foods that have been found to fight cancer include olives and olive oil, turmeric, ginger, mushrooms, dark chocolate, and red wine.
The American Institute for Cancer Research states that no food in isolation can effectively lower cancer risk. So the best advice is to eat a variety of plant foods daily—including those on this list—to ensure the most protection against cancer.


Melania Lizano

Melania Lizano is a gynecologist with 20 years of experience practicing medicine, specializing in high-risk pregnancy and gynecologic diseases. She has a Masters degree in nutrition and is certified to teach Perfect Healthand Primordial Sound Meditation.
She uses her knowledge in holistic health and mind-body medicine in her medical practice, where she treats patients in a holistic, integrative way, and promotes healthy eating and lifestyle habits in women.
- See more at: http://www.chopra.com/ccl/7-best-cancer-fighting-foods?utm_content=CCL%20Newsletter%20141008&utm_campaign=October&utm_source=Newsletter&utm_medium=email#sthash.gL5mtpc5.dpuf

Exercises You Can Do At Your Desk

Stuck At Work? 6 Pilates Exercises You Can Do At Your Desk
You May Also Enjoy
Did you know that for every inch the head moves forward in posture, its weight on your neck and upper back muscles increases by 10 pounds? Read 

With interest spreading at a rate that might have surprised Joseph Pilates himself, it’s no wonder men and women are thinking beyond the mat and taking Pilates into daily life.
The benefits are myriad: better posture, stronger abdominal muscles, greater flexibility and reduced stress. With a pedigree like that, who wouldn’t want to start practicing Pilates right now?
Well, no more excuses! Even if you’re sitting at the office right now, here are six simple Pilates-based exercises you can do in your chair that will instantly make you feel better.
1. Core Breathing
The essence of practicing Pilates starts with your core. To get a rough idea of where yours is, form a triangle with your hands and place your thumbs on your belly button. The area between your hands approximates your core.
Whether sitting or standing, find your best posture. Inhale and let your torso expand with air like a balloon (without forcing your stomach to protrude out). As you exhale, press the air out of your stomach and torso, concentrating on pulling your stomach in toward your spine.
When you think you’ve pressed all the air out, engage your stomach towards your spine another centimeter for maximum results.
2. Chin Tilt
Sometimes simple is best and that’s definitely the case with this stress-relieving exercise.
Sit or stand while putting as much space as possible between your ears and shoulders. Then gently nod your chin down towards your chest as if you are trying to hold an orange there. You should feel a stretch down your neck and spine.
Repeat the chin tilt several times without curling the shoulders or upper back. The tension relief from this simple move is immediate.
3. Shoulder Circles
Sit or stand in a tall upright position, engaging your core. Circle the shoulders forward, up, down and back for 5 repetitions.
Reverse the circles the other way for 5 more repetitions. The slower you go, the more tension you’ll release.
4. Neck Stretch
A close cousin of the chin tilt, this exercise is so effective it might earn you a promotion if you play your cards right.
Sit or stand, looking straight ahead. Tilt your right ear toward your right shoulder keeping the left shoulder from creeping up.
Once you’ve stretched your head as far to the right as you can, place your right hand just above your left ear and apply a little bit of pressure, as if you are pulling your right ear even closer to that right shoulder. Feel the tension melt out of that left shoulder. Repeat on the other side.
5. Ankle Flexes
This is a great move for getting circulation going in the legs if you’ve been working at the computer all day or sitting for an extended period of time.
Sitting in your chair, cross one leg over the other at the knee. Point the toes of the top leg as far away from you as possible and then flex the toes back. You should feel a slight stretch in your calf and shin.
Start with 10 repetitions. Repeat on the other leg.
6. Calf Stretches
One of the best things you can do during your day is to stand up and give yourself a stretch break. This one is great for getting the oxygen flowing.
Stand with your feet hip-width-distance apart. (Bonus points if you can do this looking out a window or away from your computer!)
Your feet should be parallel, facing forward, and your core engaged. Bend your knees out over your toes, then straighten back up.
Rise up onto the balls of your feet and then slowly lower your heels down to the floor.
Those calf muscles will burn after 15 or 20 of these!

Tuesday, October 7, 2014

6 Exercises To Reverse Bad Posture

Did you know that for every inch the head moves forward in posture, its weight on your neck and upper back muscles increases by 10 pounds?
For example, a human head weighing 12 pounds held forward only 3 inches from the shoulders results in 42 pounds of pressure on the neck and upper back muscles. That's the equivalent of almost three watermelons resting on your neck and back!
When you neglect your posture, you invite chronic back pain. Rounding your low back while sitting for extended periods of time in front of a computer, standing for hours stooped over, sleeping improperly and lifting poorly can all lead to debilitating aches.
Maintaining the natural lumbar curve in your low back is essential to preventing posture-related back pain. This natural curve works as a shock absorber, helping to distribute weight along the length of your spine. Adjusting postural distortions can help stop back pain.
A basic remedy to sitting all day is to simply get up! Frequently getting up from a seated position and doing these six quick and easy realignment exercises can help you reeducate your muscles from getting stuck in a hunched over cave man position.

1. Chin Tuck
The Chin Tuck can help reverse forward-head posture by strengthening the neck muscles.
This exercise can be done sitting or standing. Start with your shoulders rolled back and down. While looking straight ahead, place two fingers on your chin, slightly tuck your chin and move your head back (image at left). Hold for 3-5 seconds and then release. Repeat 10 times.
Tip: The more of a double chin you create, the better the results. If you’re in a parked car, try doing the Chin Tuck pressing
the back of your head into the headrest for 3-5 seconds. Do 15-20 repetitions.
2. Wall Angel
Stand with your back against a flat wall with your feet about four inches from the base. Maintain a slight bend in your knees. Your glutes, spine and head should all be against the wall. Bring your arms up with elbows bent so your upper arms are parallel to the floor and squeeze your shoulder blades together, forming a letter "W" (image at left). Hold for 3 seconds.
Next, straighten your elbows to raise your arms up to form the letter “Y.” Make sure not to shrug your shoulders to your ears. Repeat this 10 times, starting at “W,” holding for 3 seconds and then raising your arms into a “Y.” Do 2-3 sets.
3. Doorway Stretch
This exercise loosens those tight chest muscles!
Standing in a doorway, lift your arm so it's parallel to the floor and bend at the elbow so your fingers point toward the ceiling. Place your hand on the doorjamb.
Slowly lean into your raised arm and push against the doorjamb for 7-10 seconds. Relax the pressure and then press your arm against the doorjamb again, this time coming into a slight lunge with your legs so your chest moves forward past the doorjamb for 7-10 seconds (image at left). Repeat this stretch two to three times on each side.
4. Hip Flexor Stretch
Kneel onto your right knee with toes down, and place your left foot flat on the floor in front of you.
Place both hands on your left thigh and press your hips forward until you feel a good stretch in the hip flexors.
Contract your abdominals and slightly tilt your pelvis back while keeping your chin parallel to the floor (image at left). Hold this pose for 20-30 seconds, and then switch sides.
The next two exercises require a resistance band:
5. The X-Move
This exercise helps strengthen your upper back muscles, especially the ones between your shoulder blades (the rhomboids).
Sit on the floor with your legs extended forward. Place the middle of the resistance band around the bottom of your feet and cross one side over the other to form an "X".
Grasp the ends of the band with your arms extended in front of you.
Pull the ends of the band toward your hips, bending your elbows so they point backward (image at left). Hold and slowly return. Do 8-12 repetitions for three sets.
6. The V-Move
According to a 2013 study by the Scandinavian Society of Clinical Physiology and Nuclear Medicine, performing this simple resistance band exercise 2 minutes a day, five times a week, will significantly decrease your neck and shoulder pain and improve your posture.
While standing, stagger your feet so one is slightly behind the other. Grasp the handles, or the ends, of the resistance band and lift your arms upward and slightly outward away from your body about 30 degrees.
Keep a slight bend in your elbows. Stop at shoulder level; hold and return.
Make sure to keep your shoulder blades down and back straight. Repeat this exercise for 2 minutes each day, five days a week.
Good work!

Thursday, September 11, 2014

Yoga Sequence To Open Your Hips If You Sit Too Much

http://www.mindbodygreen.com/0-15172/
a-simple-yoga-sequence-to-open-your-hips-
if-you-sit-too-much.html

A Simple Yoga Sequence To
 Open Your Hips If You Sit Too Much

Our hip flexors can become really tight and shortened from sitting too much
which can lead to lower back issues.
So it's important for not just our sedentary society to stretch their hip flexors daily,
 but also for runners, walkers
and cyclists. We can all benefit from stretching out our hip flexors, whether it's to
 open up tight areas from
 sitting too much, or to help counterbalance prolonged or strenuous hip flexion
 from a more active lifestyle.
Yoga is great for stretching these areas. There are many asanas you can ease yourself into,
to allow for a
 gentle opening of the hips. Here is a simple six-pose sequence that you can hold fo
r five slow breaths,
and allow your body to soften for optimal hip flexor relief. Be sure not to force yourself
 into any of these
 poses, but move with patience and intuition based on what is best for your body. Alway
s be sure to
complete both sides of the body in each pose!
1. Low Lunge (Anjaneyasana)
Low lunge is ideal for those who find balancing difficult. This stretch focuses on the hips, groin
 and quadriceps.
From standing, exhale and step your left foot back and lower it to the floor with your hands framing
 your front foot. You can bring your hands to blocks or to the floor, just be sure to keep your right
foot between your hands, and directly below your knee. Inhale and lift your chest to reach up and
forward, pressing the shoulder blades in against the back. Keeping your hips square, draw the tailbone
down and gently pull your belly in toward your spine.
Hold here or for a deeper stretch, inhale and reach the arms over the head with your palms facing in.
Be mindful to lift out of the pelvis so you don't jam the lower back.
2. Crescent Lunge (Anjaneyasana Variation)
Crescent lunge opens the front of the body, extends the spine and builds leg strength and balance.
 The psoas muscle of the main hip flexor is targeted, as the thigh bone moves away from the lower
 back. The nervous system is awakened and the heart is opened.
From Low Lunge, tuck the back toes and exhale as you lift the back knee off the floor and stand 
up into the pose. Feet are hip width apart and both toes face forward. Start with your hands on
 your hips and bend the front knee to 90 degrees, with your knee over the ankle and hips pointing 
straight ahead. Keep the back leg bent if the hamstrings are tight, and only straighten if you 
can keep the pelvis square to the front of your mat. Draw the left hip forward and right hip back
 to keep the hips square, and tuck your tailbone to keep the pelvis from tipping forward. 
For more extension, inhale and raise the arms, hands apart and palms facing in, and soften the shoulders.
3. Warrior I (Virabradhasana I)
In Warrior I, the turned-out toes of the back foot 
increases hip flexion. If you press into the outer 
edge of your back foot, you will notice the hips
 square off more easily. This pose builds strength
 and steadiness, as it increases body awareness,
 improves circulation and energizes the entire body.
From Crescent Lunge, drop the back foot to 45
degrees and soften the shoulders away from the
 ears. Inhale and reach the arms above the head and soften the shoulders away from the ears.
 Exhale to soften into the front bent knee, keeping it at 90 degrees.
For a deeper stretch try reaching the right hand toward the floor and feel the hip flexor get a bit more love!


4. One-Legged King Pigeon Pose (Eka Pada Rajakapotanasana)
Pigeon pose releases tension from deep in the outer hip joint, and many people
 feel this stretch releases emotional tension as well. With the forehead resting in a forward fold, the nervous system is also relaxed.
From Warrior I, release your hands to the ground and fold the front leg to the
 floor, tucking the heel in
close to the left groin and you slide your left leg back behind you. The front shin
 should rest on your mat at about 45 degrees, but you might be able to rest it in
 parallel to the top line of your mat. Keep the front foot flexed to protect the knee
 and make sure the back of the left foot behind you is flat on the ground. Square off your hips.
Stay here, or walk the hands forward and lower the torso to the ground, and rest
 the forehead on the hands, block or mat for at least five breaths.
To take this pose deeper, walk the hands back in by your sides and inhale to reach
them above your head. Keep reaching up out of the pelvis to protect the lower back.
 Hold for another five breaths and return your hands to the floor.


5. Supine Pigeon (Supta Kapotasana)
If tight knees and hips mean Pigeon pose isn’t for you, try it lying down. This pose is a great
 preventative knee stretch as it will lengthen the iliotibilial band (ITB) that runs from the 
pelvis (on the outside of the leg) to the shin bone.
Begin with the soles of your feet on the floor and lift the left ankle and rest it on top of the 
right knee, keeping the left foot flexed. Bring the knees closer towards the chest, and thread
 your left arm between the legs and the other hand around, to join them together behind the
 right thigh.
Keeping the hips low to the ground, draw in the clasped thigh closer to the chest and open the
opposite knee wider. Soften your shoulders into the mat.


6. Camel Pose (Ustrasana)
An invigorating stretch that will open the entire front of the body and stretch the
 front of the hip flexors.
Kneel with your legs shoulder width apart, with the feet untucked and palms
 placed on the lower back, fingers facing down. Inhale to lift and open the chest, 
exhale to lower back towards your heels, keeping the gaze upwards. Be sure
 not to just throw your head back. Use the fingers in the back to encourage
 tucking the tailbone and prevent jamming in the lower back.
Hold the pose here, or for more extension, release one hand at a time to lightly
 grip the tops of the heels. Inhale to lift up and out of the pose by pressing 
on your lower back.
Photo Credit: Courtesy of the Author

Tuesday, July 22, 2014

5 Basic Yoga Poses To Make You Feel Fantastic In 15 Minutes

http://www.mindbodygreen.com/0-14591/5-basic-yoga-poses-to-make-you-feel-fantastic-in-15-minutes.html
The practice of yoga can do wonders for your overall mood, physique and peace of mind. With our fast-paced lives and crazy work schedules we rarely get to take time for ourselves to reboot. Fortunately, spending hours at an ashram or a week at a spa is not required. Yoga is the perfect practice to implement into your daily life, because you can experience its many benefits quickly. All it takes is 15 minutes a day for a sunnier disposition, heightened sex drive and a greater sense of well-being.
Here are five basic poses that will help you feel better in your own skin, and they don't take long if you want to include them in your daily routine!
Dolphin

1. Come into a straight-arm plank with wrists under shoulders and legs extended straight back. Keeping your hands in place, shift your hips up and back.
2. Point tailbone straight up to the ceiling, relax head and draw shoulders away from the ears. Press chest toward thighs, spread hands wide and begin to engage your core.
3. Hold for 10 deep breaths.
Warrior II

1. Stand with feet wider than hip-width. Turn right toes out and left toes inward at a 45-degree angle. Deeply bend right knee so thigh comes close to parallel with the ground. Keep left leg straight.
2. Extend arms directly out from shoulders and gaze over your right finger tips. Draw core in tight and stay low in the legs.
3. Hold for 10 deep breaths each side.
Triangle

1. Stand with feet wider than hip-width. Turn right toes out and left toes inward at a 45-degree angle. Keep both legs straight as your hinge at your hips toward the right leg. Draw your torso as far to the right as possible, maintaining length through your spine.
2. Place right hand above or below the knee and extend left arm directly above shoulder. Spin right hip forward and left hip back. Gaze toward the floor to stretch the neck.
3. Hold for 10 deep breaths each side.
Warrior III

1. Come into a lunge position with right foot forward (knee bent) and left foot back (straight leg). Hinge forward at your hips and bring torso close to parallel with the floor. At the same time, kick left leg up to hip-height, forming a straight line from the crown of your head to your toes.
2. Place both hands at heart center, draw belly button toward the spine and gaze a few inches in front of you.
3. Hold for 10 deep breaths each side.
Pigeon

1. Come into a downward dog (see pose #1) with tailbone pointing toward the ceiling and hands pressing into the floor. Lift right leg up to hip height, then gently swing it forward. Bend right knee and lower leg onto the mat.
2. Try to get your shin close to parallel with the front of the mat and always keep foot flexed. Left leg stays straight. Fall forward over right shin and rest hands or forehead on the mat.
3. Hold for 10 deep breaths each side.
*If your hips are very tight, please place a pillow or blanket under right hip to assist in this posture.